Home

Wednesday, June 24, 2015

Jane Dunnewold Workshop


I attended Jane Dunnewold's Dye workshop at the Pacific Northwest Art School in Coupeville. Jane took us through many different dyeing techniques. I picked up lots of valuable tips to fine tune my dyeing practice and I was able to correct the bad habits I had developed over the years.
The first exercise was to dye cloth to make a colour wheel. Jane talked about the importance of making a colour wheel that was our own personal 'colour constant' - a reference check for all colours produced. I use Joan Wolfram's 3-in-1 Color Tool but it is printed on paper. I have put on my 'To Do' list to make a cloth one.

We worked with thickened Procion MX dyes. Here are 2 different cloth samples batching. A lesson learned was: take to workshops my best fabrics for the exercises. I had taken several used 100% cotton bedsheets and got some disappointing results. I suspect one wasn't true to label and there was some polyester spun in with the cotton thread. It did not take the dye well. When the base cloth is inferior for the job it is very difficult to assess the results of the other dyeing variables.

Pots were set up outside for silk dyeing.

It was such a warm breezy day the conditions were most pleasant for working outside. I dyed all the silk I brought with me.

Shibori and random scrunch resist techniques with results that could be achieved within minutes.
Jane demonstrated many unique techniques she has developed over the years and left us lots of time to experiment with whatever we wanted. She created such an atmosphere that for me it was low stress and intensive at the same time. I felt tired at the end of each day and so keen and energised at the beginning of each day.
Jane is thinking of offering her 'Complex Cloth' course again, after a hiatus of several years. It was this course coupled with her book 'Complex Cloth', plus her own output that played a major role in a better understanding of surface design in the art world.
So keep your feelers out for 'Complex Cloth' and 'run-don't-walk' to sign up.

Monday, June 22, 2015

Studio Construction: Meanwhile, Back at the Studio

While I was away in New Zealand, a lot happened on the home front.
The cut flower bed burst into bloom.

It is hard to see, but the downspouts were made then put in place.

Ron sealed the porch concrete.

Dave finished off the porch soffit.

It is all looking good outside.

Ron is pointing out to me where different parts of the built-in cabinetry will go. The designer and carpenter visited and marked the cabinet layout on the floor.  This is the only built-in cabinetry and it has to be because this is where the plumbing comes and goes.

Saturday, June 20, 2015

Kaipara Coast Sculpture Gardens, New Zealand

Here am I surrounded by Audrey Boyle's 'Tribute', (dress fabric, Dacron, irrigation tube).
From Audrey's artist statement: 'Having worked with vines from nature, most recently Kareao (Supplejack) that once covered this very land, I decided to replicate the fern and its linear quality with all of its lumps and bumps and give it back to nature.'


Blair Fraser 'Laughing No More', (Oamaru stone, wood).
From Blair's artist statement: 'The Whekau or Laughing Owl is no more, it is extinct.'

Alysn Midgelow Marsden, 'Change', (fabric, PTFE thread, stainless steel cable).

From Alysn's artist statement: 'The form of the cocoon is understood as a place where transformation occurs; an apparent miracle, an alchemic change within a quiet contained form. The form shows occasional involuntary quivers as it is suspended. It is rocked by both its internal changes and the forces of the world around it.
The question has to be 'what is going on inside?' What will emerge? Will it be fabulous or frightening, camouflaged or brilliantly coloured?


Mia Hamilton, 'Daisy Blanket', (heavy duty plastic danger tape, crocheted twine).


From Mia's artist statement: 'Mia Hamilton remembers the 'daisy blanket' her mum and dad made as a child. Dad sheared the sheep and spun the wool whilst Mum made the daisies on an old wooden bloom loom and crocheted them together.

Just a few of the 51 sculptures in the gardens.


Thursday, June 18, 2015

Corrugated Steel / Iron Art and Architecture


I made a quick trip to New Zealand to be in on my father's 87th birthday celebrations, Mother's' Day, another family birthday and to catch up with family.

Painted corrugated steel
I was treated to a Kaipara Coast Sculpture Gardens and Nursery visit. After wandering the inspiring nursery, we had morning tea in the outdoor cafe before heading into the Sculpture Gardens. Fifty-one different sculptures made by individuals and groups have been placed throughout the magnificent gardens created by David and Geraldine Bayly.
I think it is because I have been focused on the construction of my studio for so many months, the corrugated steel sculptures jumped out at me.

'Dis-ability' by artists from Mt Tabor Trust, Thomas Hogan, Kevin Widowson, Sandy Sturgess, Ian Sangster & Rachel Clark, plywood, corrugated iron, acrylic paint.

'Goat Family' by Ian Fewtrell, recycled corrugated iron.
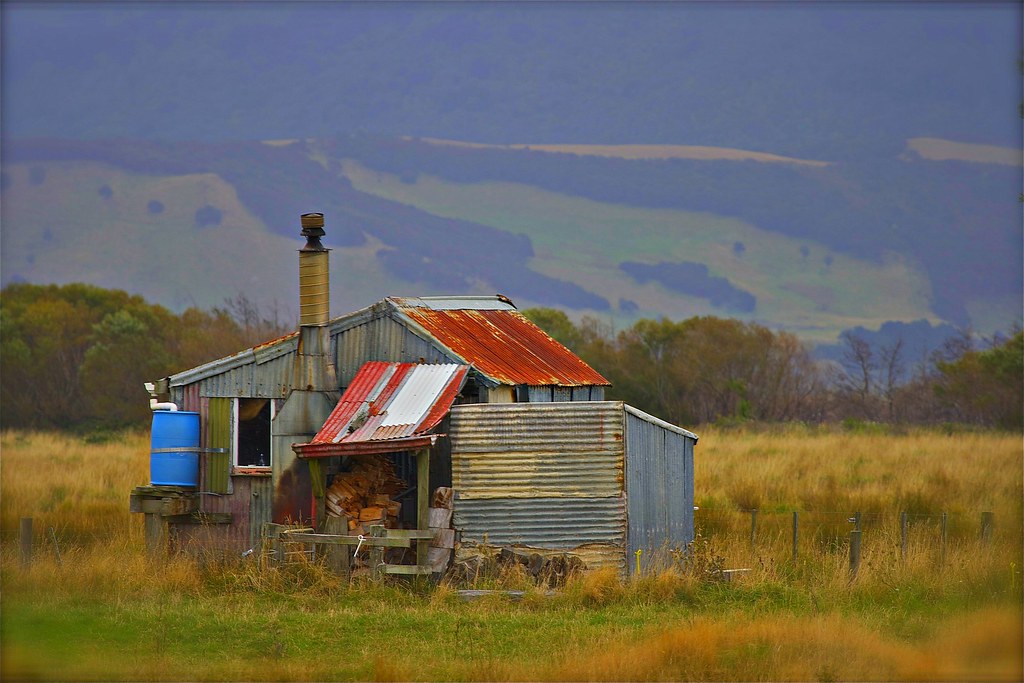
Corrugated steel is a distinctively New Zealand art medium as well as a utilitarian building material for houses, farm buildings and retail shops. Ron and I were inspired by our childhood memories of the use of this building material when we came up with the concept for my studio.

New Zealand farm shed/hut

There are also historical corrugated steel buildings on the Saanich Peninsula where we live and we are noticing many new constructions using the material in a contemporary way.

A new sail loft in Sidney designed by Checkwitch Poiron Architects.
It is a building material well suited to a wet climate.

Tuesday, June 16, 2015

Studio Construction: Gutters

The studio gets its gutters.....

... and grey, metal, no-maintenance soffit.

Proline Roofing and Gutters makes each individual gutter on site.


Metal from a large roll on the back of the machine is passed through a moveable chute which shapes the sheet to a programmed gutter design. Then it is cut to the required length. There is no waste.
The hardest part was choosing the size, shape and colour  of the gutter. OK, perhaps instaling the gutters is a lot harder. Working on roofs is still considered one of the most dangerous construction jobs.

The Green Shed is looking smart with its new gutters and soffit.
It is disappearing more and more into the forest.

Sunday, June 14, 2015

Studio Construction: Finishing the Walls


Cameron on Stilts
At the end of the clip, you can hear Cameron ask me if I have been waiting for him to use his stilts. I answered "Yes, I had been waiting all morning to catch him in action on them".

Jordan and Cameron are tapers. They are doing an excellent job on the walls. They taped the joins, trowelled on wet plaster mud then left to wait for the plaster to dry. When they returned they sanded the plaster to a smooth finish.


Cameron holds a strong light at different angles while he sands so he can see any imperfections in the plaster.


Next, Marshall, the painter arrived. He wasn't long putting the first coat on every surface.


Everyone has done such a good job the walls and ceiling are perfect.
Initially, I looked into alternative finishes for the interior but drywall and paint have lots going for them. Drywall has high resistance to mold if kept dry. It has a high fire resistance rating, provides rigidity to the wall and its acoustic rating is OK. It is relatively inexpensive and can be easily repaired. When it is plastered and sanded to a smooth finish then painted in a light colour it is a highly reflective surface. In my working area, I need to have even light without distorting shadows. I want to make the most of the light coming in the windows and the walls reflection of that light so the minimum amount of electrical lighting needs to be installed to do the job.
Time for me to do another vacuum.


Friday, June 12, 2015

Studio Construction: Cedar Soffit

Dave is making the porch and arcade soffit from strips of rough finish, tongue and groove, western red cedar.

 It smells so good out near his saw bench.

I knew it was a special delivery when the truck arrived with its load wrapped in plastic.


The finished soffit over the arcade...


...and over the porch.

It gives just the right look and feel we wanted for the shed.

Meanwhile, we have finished backfilling the trench. I can now continue with building up the garden bed over the whole area.
Happy birthday, Donnel. Hi, Walter. 
My sister and brother-in-law read my blog every Saturday morning in a cafe over their flat whites.

Wednesday, June 10, 2015

Studio Construction: Time For a Site Clean up

Ron and I spent the day cleaning up the construction site.
Manufactured wood and concrete board went into the skip. Anything made with treated timber or glues we don't want to burn in the fireplace.

The cladding off cuts went into a recycling pile.

I stacked all of the shorter boards that can be used as firewood mostly as is.

Ron pulled out nails and stacked the longer boards that need to cut into shorter lengths for the fireplace.

I spend several hours once again vacuuming up construction dust. This time is was plaster dust. I needed a shower after I had finished.
Now the site is much tidier.

Tuesday, June 9, 2015

Back Yard Project: New Garden Bed

I am so pleased the trench is now filled because it means I can get going on establishing the new garden bed. It is actually an extension of a smaller bed that consisted of weed cloth and river stones around a Douglas-fir tree so the soil was deprived of its food source from above. A track came down the hill close to the tree compacting its root zone even more. 
I have marked out a new track that is equidistant between the trees. This track has determined the boundary of the new extension of the garden bed. I am defining this boundary by building a wall using the rock uncovered by the trench digging. It is granite that was blasted and dug out when making a space for the house foundations and lower living level. This in-situ sourced rock works with the geomorphology of the land, unlike the imported river stone. To my eye, a bed of river stone suggests a seasonal torrent of water flowing down the hill beside the house, which visually generates a most unsettling feeling.
The first step in making the new bed is to sprinkle glacial rock dust to stimulate the soil organisms. 

Next is to provide the soil organisms with food. A layer of paper is laid down. We collect all of our used paper for this purpose. Then a thick layer of cardboard is laid on top. Any cardboard with a shiny finish is rejected and put in the city recycling bags for them to deal with the non-organic ink chemicals.
The cardboard is food for the organisms, particularly the worms and wood lice. It also suffocates grasses which I am particularly keen to eliminate from the forest.


Next a layer of coffee grounds and coffee filters is spread over the cardboard. With the warmer weather, there are more tea leaves as people switch to cold drinks such as iced teas.
I have saved all of the plain cardboard and paper packaging from all of the materials, and equipment brought onto the construction site to build the studio. Now it is all flattened and under coffee grounds.

Next layer is made up from sticks/snags and rotting wood as a source of food and homes for another range of bugs. Tree litter that falls on the driveway is swept up and added to the mix.

While working on this bed I have made a new discovery. I really enjoy placing stones to make them fit together. When I have a spare hour I find myself outside building this stonewall.
The challenge with this new bed is keeping it watered so the soil organisms can do their job. The whole irrigation system was destroyed when the construction road was made so the new bed will have to be hand watered during our dry season. I have yet to decide about when and what to plant, but I do know the whole bed needs some sort of protective cover layer in the meantime.

Friday, June 5, 2015

Studio Construction: Meanwhile Back at the Studio

Dave has started framing up for the outside stair footings.

He said it was lucky he didn't make the framing any smaller because he woudn't have been able to fit inside.

I try out what it is like to have power in the studio.

The tapers are back adding another layer of mud and sanding it back.

Tapers' tool belts hold their own specialised tools.

And they wear stilts. I have been looking out the window on and off all day hoping to catch either Cameron or Jordon wearing their stilts.

Light fixtures have been installed in the crawlspace. Code requires the fixtures dangle and not be fixed to the ceiling. This is so the bulb will move and not break if accidentally walked into.