Home

Saturday, December 26, 2015

Jane Davies' 'Big Fat Art' Workshop

I attended a Jane Davies' 'Big Fat Art Workshop, Jane's Blog.
We did many 'technique' exercises working quickly on large sheets of inexpensive paper.

It was all about layers using many different media and working quickly to stop over thinking it.

A sampler recording how to block out large shapes with different edges.

An exercise in breaking all the design rules. Every added element had to be different in shape, colour, placement etc.
I have never been shown how to work properly with acrylics but this didn't stop me.
I made some ugly pieces but learnt a lot doing each exercise.
We all worked hard and fast and it was very freeing.
Thanks Jane for a great workshop.

Monday, December 21, 2015

Backyard Project - Phase 2 - More 'Before' Shots

The mound in the distant left is the top soil that was taken off the backyard area and kept separate. I scattered 10 different types of seeds over the mound and left them to grow as a green mulch to be dug into the soil when it is moved again. They will add nitrogen and organic material making it a richer soil.
To the right of the mound is a garden of transplanted plants waiting to be moved again once the new beds are made. They had to be hand watered over our very dry summer. All of them survived and put on a season of growth.

I marked out the studio beds with plastic tape and started to build up the soil with paper, horse manure, coffee grounds and shredded garden cuttings.

The arcade down the front side of the studio has badly compacted soil after all of the construction activity, but it is not a problem because we don't want anything to grow there. It is a path and will be covered with gravel. The arcade roof will stop a lot of the rain reaching this area so any plantings would have suffered from winter drought. Even with these anti-growth conditions a few tenacious plants have popped up to do their soil repair job.

The bank on the right is all fill and will need a retaining wall. 

We removed the hot tub with the idea of putting the water and power to a better use because this is the sunniest and hottest place in the whole backyard.

A thick layer of shredded garden trimmings has been laid where future raised beds will be built.

We continue to build up the layers in Gunilla's Garden while soil organisms are hard at work doing their job.
We are ready for the excavator to arrive.

Thursday, December 17, 2015

Backyard Project - Phase 2 About to Begin


Phase 2 of the Backyard project is about to begin so I took a lot of 'before' photos.
What is left from the studio construction are 2 piles of untreated wood sorted by length. The left hand 'short' pile is firewood for this winter. The 'long' pile will have to be cut before it will fit in the fireplaces.
Also, the rough gravel construction pad for vehicles and materials is left. In some areas, the gravel will be scrapped off and used elsewhere but most of it will be incorporated into the design as is.

The service track coming into the backyard area will be reduced in length and width, but will again be used by construction crews.

Ron and I laid out rough lines of where structures will be built, as guides for the earthworks.


I used wool to mark out the shapes of the 3 hugelkultur beds. 


The trees that were cut down to make a clearing for the house and lawn 12 years ago will finally be put to good use.

I have piled up the ornamental river stone in preparation for using it in a more functional way.
I enjoy walking around visualising how it is all going to look in 3 to 5 years.

Wednesday, December 9, 2015

Studio Design - Pattern Language #159 Light on Two Sides of Every Room


Pattern Language #159 Light on Two Sides of Every Room
Problem - ' When they have a choice, people will always gravitate to those rooms which have light on two sides, and leave the rooms which are lit from only one side unused and empty' p. 747. 'In rooms lit on one side the glare which surrounds people's faces prevents people from understanding one another' p. 748-9.
Solution - 'Locate each room so that it has outdoor space outside it on at least two sides, and then place windows in these outdoor walls so that natural light falls into every room from more than one direction.' p.750.
There is a step down into the sunny room where I go to read, stitch, have tea and contemplate. 

It has windows on 3 sides that look out into the forest.

Stitching Corner
'This pattern, perhaps more than any other single pattern, determines the success or failure of a room.' p. 747

My friend comes and joins me in the room for tea every day or so. Notice how well lit his face is.
'The importance of this pattern lies partly in the social atmosphere it creates in the room. Rooms lit on two sides with natural light, create less glare around people and objects; this lets us see things more intricately; and most important, it allows us to read in detail the minute expressions that flash across people's faces. the motion of their hands.... and thereby understand, more clearly, the meaning they are after. The light on two sides allows people to understand each other.' p.748

The light had been perfect for stitching until the longer winter days. I have now brought in a floor lamp and Ron has put a higher wattage bulb into the overhead ceiling fixture.
Apart from that, the room is working very well and is such a lovely place to be in.


Monday, November 30, 2015

50 Shades of Grey - A Carol Soderlund Workshop at Pacific Northwest Art Centre, Washington

I was fortunate to be able to attend one of Carol Soderlund's workshops- Carol's website.
She taught us her dyeing techniques while guiding our explorations of the colour wheel's neutral territory. With Carol exploring neutrals is like going down a rabbit hole.

Carol applies the dye in her unique way to get an even distribution of colour on the sample.
We cut up all of our samples and shared them with everyone else in the class.
Carol has developed a system for filing samples with their recipes in a binder making it a valuable resource.

Carol is looking very pleased because this is an exciting day in the life of a die-hard dyer.
A package arrived from Rupert and Spider containing a pot of the very first neutral grey in a pure dye powder. Up until now all greys were a mix of other colours and they tended to separate when dyeing.

Carol gave us an exercise in gradation to test the new grey dye.
She gave each of us a pure colour and using her dyeing technique we made controlled samples from the pure colour through to grey.
The results were most pleasing.

Those who wanted to went outside to learn about different discharge methods and the effects on different colours.

We got some exciting results.

Carol is an excellent teacher and I learned so much from her over the 5 days.
I learnt a new dyeing technique and vastly expanded my understanding of where neutral colours come from. 
Every student came away with a binder full of samples and recipes for hundreds of neutral colours and the understanding of how to make even more.
I look forward to taking another class with Carol.

Thursday, November 26, 2015

Studio Design - Pattern Language #200 Open Shelves, #201 Waist-high Shelf

'A Pattern Language' by Christopher Alexander is a collection of patterns found in well-designed living spaces. I applied many of these patterns to my studio design.
Pattern #200 Open Shelves
The Problem - 'Cupboards that are too deep waste valuable space, and it always seems that you want what is behind something else'.
The Solution - 'Cover the walls with narrow shelves of varying depth but always shallow enough so that things can be placed on them one deep - nothing hiding behind anything else.'
I measured the depth of some of the books and binders I wanted to have in the studio and used that measurement for the depth of the shelves in this bookcase. Likewise in the rest of the studio the shelves depths and the varying spaces between them match the sizes of the articles stored on them. Things are stored only one item deep, mostly.


Pattern #201 Waist-high Shelf
Problem - 'In every house and every workplace there is a daily "traffic" of objects which are handled most. Unless such things are immediately at hand, the flow of life is awkward, full of mistakes; things are forgotten, misplaced.'
Solution - 'Build waist-high shelves around at least part of the main rooms where people live and work. Make them long, 9 to 15 inches deep, with shelves or cupboard underneath. Interrupt the shelf for seats, windows or doors.'
The 12" top of the bookshelf doubles as the needed waist-high shelf where stuff gets put. It also serves as the protective back for the Drawing Centre. Papers won't blow off the desk when the front door is opened.


Drawing Centre
This is where I put the cork mat I made from leftover floor tiles that didn't work on the cutting table. The area is big enough to hold a portable sloped drawing board that I use when doing design work.

Desk Centre
Attached to the Drawing Centre is the Desk Centre and both share the one chair. Underneath there are 2 basket stacks on wheels stored in otherwise unused space. Art materials are stored here and easily accessed from either work area.

Desk Centre
Each morning after I enter the studio, I start work here with some drawing practice and writing in a journal. These 2 activities slow me down and make me focus on what I plan to do that day. I end a studio session here too. I write in the journal  and plan what I will do next day.
Whenever I need extra horizontal workspace I can easily clear off these few things and temporarily free up a large area.The simple L-shaped design gives a lot of flexibility in how the space can be used. 


Monday, November 23, 2015

Studio Sewing Centre

While making pillow covers from molas, I also used the Sewing Centre.

View from the front door looking at the Project Table and Design Wall.
The Sewing Centre is to the right.


The Sewing Centre is basically the same setup I had in my old studio. It worked and I couldn't come up with a better solution until I had worked in this new space for a while.

The sewing table was a daughter's desk I seconded when she left home. It is large and works well.
For my birthday, I have asked for a new sewing chair. It was a used chair when I got it and I have recovered it twice, but now the foam is disintegrating. I need a chair in a desk area I am setting up in the house so this one can go there.
In an otherwise dead corner under the table is a tiered basket on wheels with all of the tools and equipment for sewing.


I like old 50s to 70s government issue furniture. It is usually well worn and very functional. This old map cabinet is where I sort and store stabilisers only a chair swivel away from the sewing table

A 2nd table holds the serger/overlocker. It can easily be moved to the top of the stabiliser/map cabinet when I need to work on the embellisher. They are both light machine and easy to lift into place. I don't use them as often so it wasn't worth the real-estate to give them each a table.
The one chair works with both tables.

Over the cabinet is a window with a view of the forest. It lets in soft south easterly light and keeps me in touch with what is happening outside.
One thing I have been disappointed with is 2 birds have flown into the front windows of the studio. I had thought the lower porch roof would stop them from thinking it was a place to fly through. Hopefully, once the plantings in front of the studio are in this will happen a lot less.

From the Sewing Centre, I walk along the design wall to the back of the Project Table to shelves with boxes of machine threads. No natural light can reach them so they are protected from fading and premature ageing. 

Mola - detail
The old Sewing Centre still works in its new location so I guess I won't be changing anything in the near future. But I will continue to look out for design ideas to improve the space.

Friday, November 20, 2015

Making Mola Pillows working at the Ironing and Cutting Centres


While making the mola pillows, I worked at 2 more centres in my studio.

The Ironing Centre
The ironing board has an extension to make it a rectangular shape better suited to ironing lengths of cloth. I have 2 irons a steam iron and a dry iron.


The power outlets for the irons and the sewing machine were put into the floor to keep the cords from crossing the work surfaces.

The rack under the ironing surface holds a variety of pressing clothes, water sprayers and spray starch.

The Cutting Centre
After the mola had been steamed I walked a couple of steps to the cutting centre. 
It sits in the middle of the area where I can move around all 4 sides while cutting. It saves on the number of times the fabric has to be repositioned.

The left-over cork floor tiles on the left I thought would make a useful cutting surface when using the Exacto knife but the cutting rulers bumped up against the tiles so they had to go.

I moved them across the walkway to the drawing centre.
After a minor adjustment, I found the Ironing Centre and the Cutting Centre work fine.


Saturday, November 14, 2015

Etsy Ravenmadeworks - Mola Pillows

I have made a series of pillow covers using refreshed vintage molas and put them in my Etsy shop Ravenmade Works.
Molas are the embroidery of the Cuna Indians of Panama. They live on the San Blas Islands on the Atlantic side of Panama.
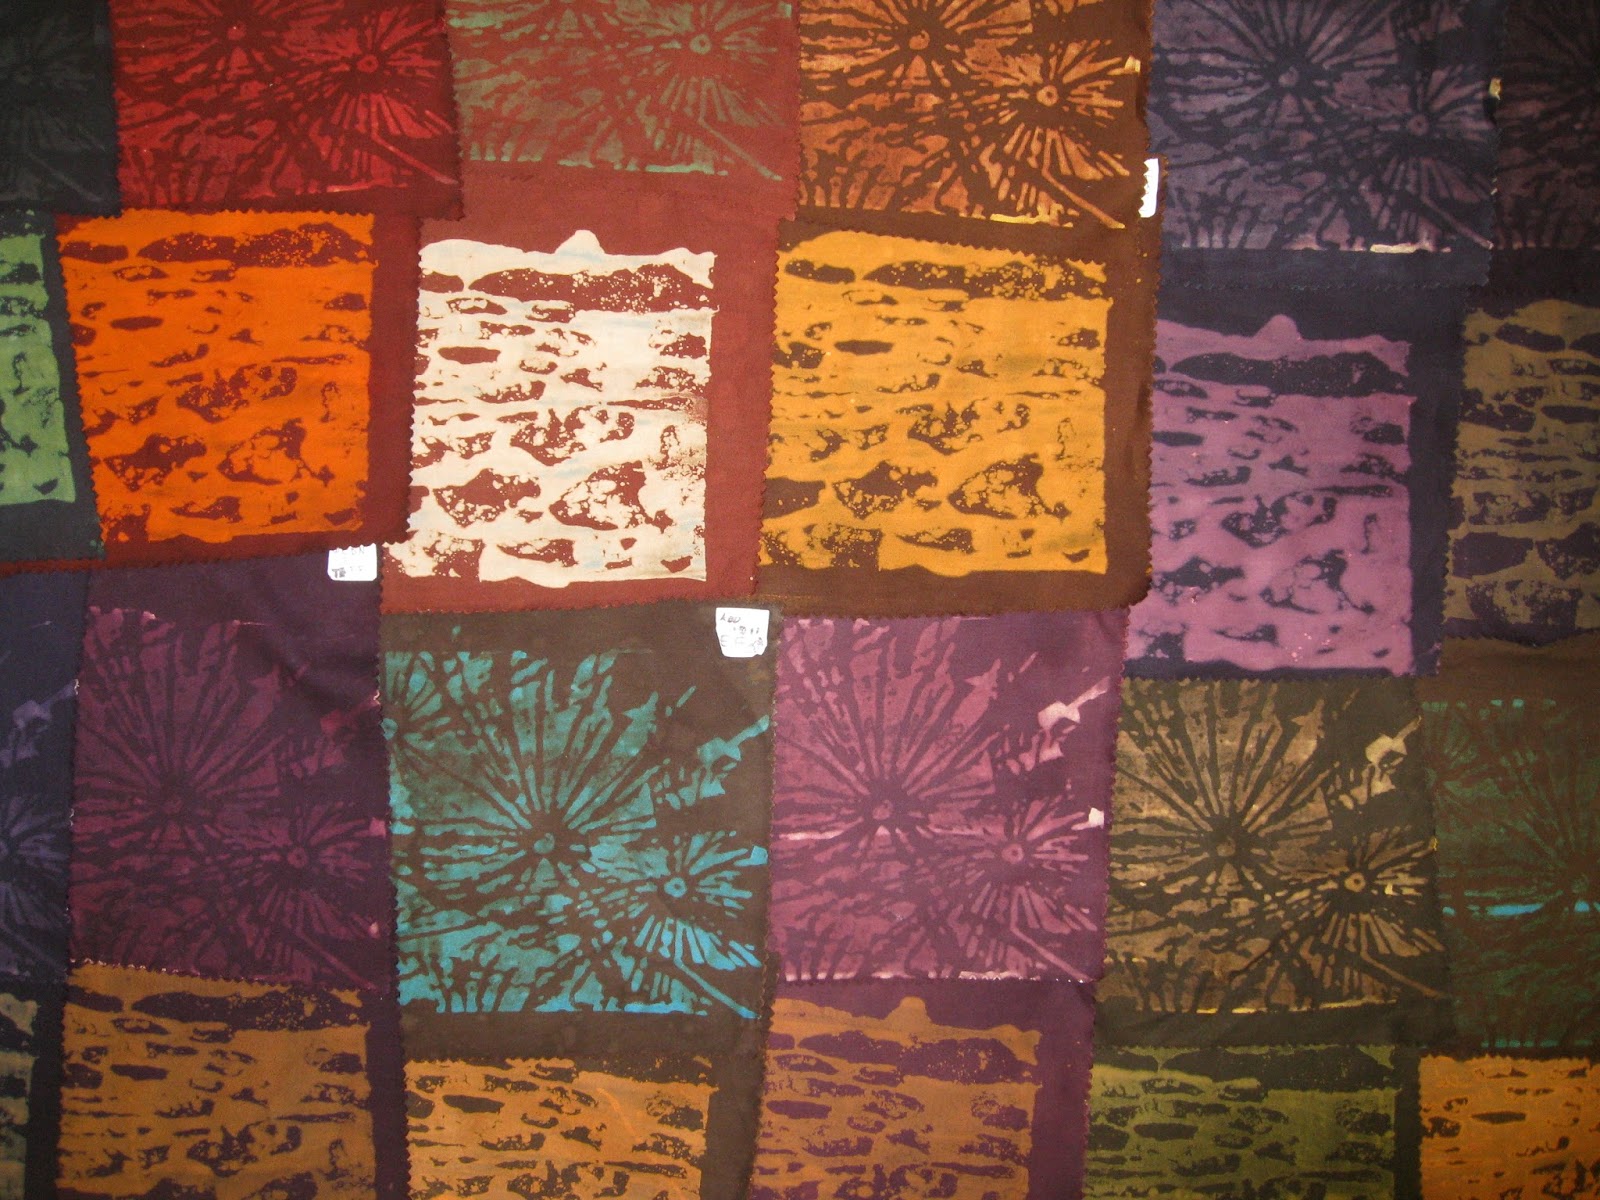
This well-worn mola (above) is a relatively simple design with strong mirror symmetry, all features of older traditional work.

The back shows the ground fabric has been made from 3 different fabrics pieced together and they have faded at different rates.

The front view of the 3 different red fabrics making up the ground. 
Orange then black fabric were layered on top of the red ground then the 3 layers were basted together. Smaller pieces of different coloured fabric were inserted into specific areas according to the design - see the green and white areas above. 
The design was drawn or traced onto the top most layer then basted with thread along the design lines. The top layer was cut about 1/8" on each side of the line before the cut edges were folded under. The folded edges were hand creased then the edges were hand stitched down. It is an embroidery technique known as reverse applique or cut back applique.


The traditional designs evolved from elaborate body painting and reflected things observed in the environment. 

This mola has inserts of printed cloth most likely acquired by trade or from visitors to the islands.

'Mola' means blouse and they were made in pairs - two identically designed rectangular pieces, one for the front and one for the back of the blouse. The horizontal line denotes the top of the panel, often accentuated with rick rack.
The above mola is more complex in design and detail and has many different inserts suggesting it was made for the tourist market. 


The back shows the density of the hand stitching necessary to execute a more complex design.
The purple strip at the top was likely the fabric the mola was attached to to make the yoke of the blouse.
It was very popular in the 60s and 70s for travellers passing through the island archipelago to buy molas. Women would sell their worn blouses and make new ones to wear. 


Today most mola production is for the tourist market generating valuable income families have become dependent on. Many contemporary molas are made in a wide variety of sizes, are often simpler, as above, or more complex to get higher prices and are brighter in colour. They are incorporated into clothing and home decor items to add value to the product.

Traditional Mola Blouse worn by a San Blas woman.