Home

Showing posts with label colour. Show all posts

Saturday, November 26, 2016

Backyard Project vs. Studio Work

You might think with all of my postings about the Backyard Project that not much is going on in my studio. 

Here are some pics to show that I am working in my studio...

...until there is action outside.
Delivery of the cement.

This is an impressive little 3-wheeled forklift.
It was easily able to manoeuvre along the paths to drop off its load conveniently close to the job site.

These bags of cement will be mixed to make the concrete footings for the propagation room.

I have checked everything out. Now I can go back inside my studio to the work in hand.
The first school report I ever got had the comment "Lesley is easily distracted." 
As a 5-year old I had to ask my mother what that meant. 
Her answer, "If someone came to the door of the classroom you would look up." 
My reply, "Well how would I know who came to the door?" 
I guess that teacher nailed it, all those years ago.


Tuesday, November 22, 2016

Carol Soderlund Workshop - 'TRUE COLORS: Developing a Personal Palette'

Carol's samples of dyed fabric using different sets of primary colours.

In the fall I attended a Carol Soderlund workshop at the Pacific Northwest Art School.
'TRUE COLORS: Developing a Personal Palette'

Building a reference for my chosen personal palette.

Early in the week, I met one-on-one with Carol for my Palette Chat where I showed her my chosen palette. While looking at Carol's sample binders with over 80 different colour families she helped me pick a selection of primary colours to work with over the rest of the week.


The 1st class exercise was a group one where we each dyed a set of samples using different primaries. These were cut up  and shared so everyone had small samples for their own binder.

The Big Squeeze Dye Technique

This was one of my favourite techniques Carol showed us. 
It is a very quick way to get a range of values while shifting the hue.

Lovely results from another student using another simple dyeing technique.

This other technique also produced a shift in value and hue while using only 3 primary colour dyes.

Here are my samples. I also incorporated folding the fabric to produce a pattern.

Using this technique one could produce a lot of more randomly dyed, multi-coloured fabric easily and with minimal washout.

My Dye Table

Not only did I learn so much more about colour over the week I also came away with an understanding of many more dyeing techniques. I now know how to dye fabric in a specific colour palette for any future bodies of work.
Thank you Carol for another exceptional workshop
Carol will be back at Pacific Northwest Art School next year, September 9 - 13, 2017 to teach 'In the Thick of It,' a workshop about ways to use thickened Procion MX dyes on fabric.

Monday, October 17, 2016

Horticultural Centre of the Pacific - a regular haunt

The Horticultural Centre of the Pacific is many things and there are many reasons to visit. Ron and I have been members from the first year we arrived on the island and we continue to visit for different reasons.

This visit focused on studying the Butterfly and Insect beds. I was looking for plant ideas for the Water Drop Insectary and Feather Bird Haven hugelkultur beds in our Backyard project

Hmmm... there is a possibility - Amaranth - red to attract hummingbirds, seeds for fall bird feed and it is a dye plant. I am particularly interested in multi-functioning plants.

The Butterfly and Insect bed is right next to the Plant Sale Centre. I whipped out of my bag my plant lists, gave one sheet to Ron and we searched for wanted plants. There was nothing that day but next visit I may find enough to fill the car.

Since I have been building a number of different types of stone walls for the Backyard Project I have been noticing stone walls everywhere. This is one of my local favourites.
We stopped in for a drink at Charlotte and the Quail Cafe before leaving knowing we would be back for the upcoming Fall Plant Sale.


Friday, August 12, 2016

Yukon Cryosphere II, Hydrosphere - Work Continues

Working with slippery synthetic sheers I can't keep the large pieces of fabric under control. Solution - hang them on the wall and take down as needed.

My current problem is to find a method for making a soft material appear hard. 
I have made tapered tubes. They need weights in the bottom to keep all lines vertical, the way water falls and freezes.  I considered lead fishing weights but couldn't find any small enough and they would all have to be painted white.

Solution - Beads. I cleaned out my white bead stash then scoured all thrift stores in a 20-mile radius. I sorted them by size and made 3 different soup mixes.

The beads are successfully doing the job of weighing down the points but now the tubes don't look substantial enough. I have decided to stuff each tube with fine interfacing. It took a long time and was hard on my hands.

To give my hands a break I started making the flowing water panels - cheesecloth dry-felted onto flat sheer tubes.

I am laying out the flowing water panels to see if I had enough of them and enough variety in length and width.
In the meantime, in the back of my mind, I am working on how to hang these individual tubes and panels. Percolation time, again.

Friday, April 29, 2016

Carol Soderlund's Dyeing technique

Last year I attended one of Carol Soderlund's workshops and learnt how to dye neutral colours using Procion MX.
She also taught us her dye technique that I have since been able to set up in my studio.
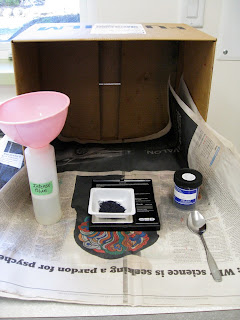
This is the set-up for weighing dye powder to make the stock solution - cardboard box, newspaper, spray bottle full of water (not shown), face mask (not shown), fresh dye powder from Pro Chem, scale from Amazon.


Dye Station
Dye weighing and stock solutions behind, dye mixing and dye application in front. 
This set up is to make colour samples. I would move the dye application to a larger table to dye yardage.

Batching
 Dye samples on plastic covered tables overnight to 24 hours plus.

Rinsing 
Keeping light and dark fabrics separate the excess dye is washed out under cold running water in the right-hand sink. Then the fabric is put into fresh, cold water without being crowded, on the left side.

Filling the stock pot from the instant hot water tap, kept at just below boiling temperature.

Setting the Dye
The pot is put on an induction hot plate. The temperature is set at boiling and timer for 10 minutes.
After the fabric has been boiled it is transferred to the spinner where excess water is spun out and drained out into the sink.

Polishing
I like to steam iron damp fabric dry. In laundry jargon, it is called polishing. 
I use a Reliable brand, heavy iron that produces a lot of steam.

The rectangle shaped ironing board is ideal for ironing yardage but there is a weakness in the design. When working at the left end of the board it tends to tip. My solution is a counter-weight at the other end - a lovely piece of granite that turned up when earthworks were going on for the Backyard project.
This dyeing set up is simple, flexible and works so well. I am very grateful to Carol for so generously sharing what she has learnt over years of experimentation to understand the fine details of the dyeing process.

Saturday, March 19, 2016

Malaysia - Things Textiley

At the end of 2015, our annual family holiday was spent in Malaysia.
Malaysia has lots of things textiley to interest those who are interested in fibres and textiles.

Here am I standing beside one of the king's guards inside his guard house, where it was in the shade and breezy (hence the flying hair) while it was 34 degrees and body dripping humid in the sun.
The king's guard is wearing an impossibly clean white uniform trimmed with gold braid and epaulettes. Wrapped over the top of his uniform is a length of cloth secured with a gold belt. It is the traditional Malay men's garment akin to a sarong and called a sampin. The shimmering cloth is handwoven from either cotton or silk (I didn't risk bending down to confirm the fibre with that bayonet so close by) with a supplementary weft of gold to make the elaborate traditional pattern. His songkok hat completes the traditional Malay man's ensemble.

I took this pic to capture the line up of buses that look like colourful ants with their antenna-like mirrors. It was only when looking at the image later I saw I had also caught a sampling of the typical dress worn by people of different races and beliefs.
Left and wearing blue are Muslim Malay women with their body garments covering their whole body except for their hands and head. Their heads are covered with hejab scarves tied and pinned in place.
In the middle are 2 Indian Malays, the left one wearing a Punjabi suit with its full trousers pulled tightly around the waist with a draw string and the pant leg pulled in by a cuff around the ankle. A long, loose fitting simply-shaped shirt is worn over the top.
The other Indian Malay woman is wearing a sari outfit, a 5 to 9 yard length of cloth skilfully wrapped around her body and secured by folding and a tight fitting short-sleeved choli blouse. 
Both of them have finished off their outfits with matching baseball caps which may be compulsory wearing for their tour party. 
The 2 other people in the image are dressed in the international style found in most countries.


Many of the religious and sacred sights we visited had sumptuous old embroideries.
A banner hung outside a Chinese ancestral worship centre.

A detail of the above banner shows the traditional Chinese gold and silk embroidery on a silk ground.

These fire men's jackets caught my eye. Firstly I wondered why firemen would wear camouflage and I noticed the high intensity colour of the camouflage. Are there two oxymorons at work here?

Every city in Malaysia has its 'Silk Centre' where the fabric stores are found side by side. Each one is an Aladdin's Cave (for the Textiley Person) with the regular shop-front opening up as one is lured back into it's depths, with fabrics stacked floor to ceiling down every narrow aisle. Digging and persistence will lead to the discovery of treasures.

Monday, November 30, 2015

50 Shades of Grey - A Carol Soderlund Workshop at Pacific Northwest Art Centre, Washington

I was fortunate to be able to attend one of Carol Soderlund's workshops- Carol's website.
She taught us her dyeing techniques while guiding our explorations of the colour wheel's neutral territory. With Carol exploring neutrals is like going down a rabbit hole.

Carol applies the dye in her unique way to get an even distribution of colour on the sample.
We cut up all of our samples and shared them with everyone else in the class.
Carol has developed a system for filing samples with their recipes in a binder making it a valuable resource.

Carol is looking very pleased because this is an exciting day in the life of a die-hard dyer.
A package arrived from Rupert and Spider containing a pot of the very first neutral grey in a pure dye powder. Up until now all greys were a mix of other colours and they tended to separate when dyeing.

Carol gave us an exercise in gradation to test the new grey dye.
She gave each of us a pure colour and using her dyeing technique we made controlled samples from the pure colour through to grey.
The results were most pleasing.

Those who wanted to went outside to learn about different discharge methods and the effects on different colours.

We got some exciting results.

Carol is an excellent teacher and I learned so much from her over the 5 days.
I learnt a new dyeing technique and vastly expanded my understanding of where neutral colours come from. 
Every student came away with a binder full of samples and recipes for hundreds of neutral colours and the understanding of how to make even more.
I look forward to taking another class with Carol.

Thursday, September 17, 2015

Kim Eichler-Messmer Dye Workshop

For a couple of years now I had been wanting to attend Kim Eichler-Messmer 's Percentage Dyeing Workshop so I signed up straight away when I saw she was coming to the Pacific Northwest Art School in Coupeville, Washington. (Check out  their just published 2016 calendar)

Kim practices and teaches a percentage system that makes it possible to reproduce colours exactly. 
Day one focused on mastering the basic system of weighing the fabric then adding precise amounts of dye from stock solutions. 

We each made 2 sets of our basic palettes, one in dark values and one in light values. We used these two sets as a starting point for all of the following exercises.

Homework was to find some favourite images and isolate 4 to 7 of the most important colours in each of them. Next day we sifted through a huge pile of Kim's paint chips and the ones we had brought with us to find colour matches with our chosen images.


Then we set about dyeing white fabric to match the colours in our chosen images. 
That was a fun exercise and a most valuable skill to learn.
We also learnt how to made many different types of colour gradations.


Each person cut up their samples and shared them with everyone else. We left the class with a big bundle of samples and instructions on how to reproduce each one.

I rewrote all of the recipes into a new dye notebook, numbering each one to match with the unique number on each sample. What a valuable resource that I can keep adding to. 
I used to dye lots of fabric in  a haphazard, non-repeatable way then pick from the fabric pile the colour I was looking for. Now I know how to dye to replicate any colour, make a value gradation, from the palest to the darkest, produce a 2-colour gradation going from bright to neutral with no change in value and how to scale up to any quantity of fabric with consistent results. No more random dyeing for me.
Thank you, Kim, for  teaching an invaluable technique with infectious enthusiasm, never-ending patience and a great depth of dye knowledge.