Home

Showing posts with label studio. Show all posts

Friday, April 29, 2016

Carol Soderlund's Dyeing technique

Last year I attended one of Carol Soderlund's workshops and learnt how to dye neutral colours using Procion MX.
She also taught us her dye technique that I have since been able to set up in my studio.
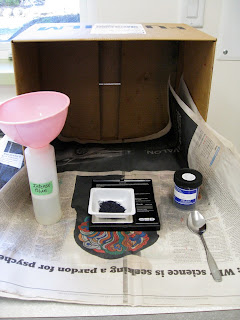
This is the set-up for weighing dye powder to make the stock solution - cardboard box, newspaper, spray bottle full of water (not shown), face mask (not shown), fresh dye powder from Pro Chem, scale from Amazon.


Dye Station
Dye weighing and stock solutions behind, dye mixing and dye application in front. 
This set up is to make colour samples. I would move the dye application to a larger table to dye yardage.

Batching
 Dye samples on plastic covered tables overnight to 24 hours plus.

Rinsing 
Keeping light and dark fabrics separate the excess dye is washed out under cold running water in the right-hand sink. Then the fabric is put into fresh, cold water without being crowded, on the left side.

Filling the stock pot from the instant hot water tap, kept at just below boiling temperature.

Setting the Dye
The pot is put on an induction hot plate. The temperature is set at boiling and timer for 10 minutes.
After the fabric has been boiled it is transferred to the spinner where excess water is spun out and drained out into the sink.

Polishing
I like to steam iron damp fabric dry. In laundry jargon, it is called polishing. 
I use a Reliable brand, heavy iron that produces a lot of steam.

The rectangle shaped ironing board is ideal for ironing yardage but there is a weakness in the design. When working at the left end of the board it tends to tip. My solution is a counter-weight at the other end - a lovely piece of granite that turned up when earthworks were going on for the Backyard project.
This dyeing set up is simple, flexible and works so well. I am very grateful to Carol for so generously sharing what she has learnt over years of experimentation to understand the fine details of the dyeing process.
Friday, April 15, 2016

Studio: Pattern Language # 145 Bulk Storage


Pattern Language #145 Bulk Storage
Problem - 'In houses and workplaces there is always some need for bulk storage space; ...- all those things which you are not ready to throw away, and yet not using everyday.'
Marie Kondo would agree this problem needs a solution but those who work with cloth have a much greater need for lots of bulk storage area.
The architect took advantage of the sloping ground and with only a little more excavation we have a 'crawlspace' under the studio. Our municipality does not allow a full height room in an outbuilding but 6' 2" is still a comfortable height to move around freely in.
Coming in through the side door to the left is my natural dye storage station. That is Japanese indigo hanging to dry and walnut dye in the jars, both studio warming gifts from thoughtful friends. The plastic containers are 2 different types of rust buckets.

To the right of the opening is storage room for leftover building materials for repairs and other uses. I am also drying 7-foot tall teasel stems here.

Further along this side is where I placed all sorts of hanging devices and the longest packing materials.

One day I found this boat stored in an empty spot! I was assured it was the perfect spot for it over the winter. It can stay as long as I don't need that space

Straight ahead is where I store completed artworks in their shipping materials. Most of my finished work I prefer to hang in the house because it fares better there.

Into a small alcove is a stack of packaging and shipping materials...

...and to the left my Etsy packaging and shipping supplies, pillow forms and pillow covers.

 In the centre of the alcove are 2 small raised tables where I package works for shipping.

We finished the crawlspace with a polished concrete floor and low-grade plywood on the walls, both hard wearing, low maintenance, low-cost finishes and utilitarian in style. It is completely moisture-proof and there is a small wall heater on a thermostat to keep the room above freezing in winter. It works out about 50% of the whole building area is flexible bulk storage space.

Pattern Language # 145 Bulk Storage Solution
'Do not leave bulk storage til last or forget it. Include a volume for bulk storage in the building - its floor area at least 15 to 20 percent of the whole building area - not less. Place this storage somewhere in the building where it costs less than other rooms - because, of course, it doesn't need a finish.'

Check.


Thursday, January 28, 2016

Backyard Project: Studio Garden Beds

Ron cuts a log to size with the chainsaw.

Tom places it to make the first side of the raised beds beside the studio porch.
He has also begun the foundation of the path leading to the studio.

He uses the hand-like attachment to nudge the log in place.

Tom selects another log from his sorted piles.

Ron cuts it to size.

Tom mixes up different materials to make a rich soil.

Two bucket scoops of soil and the bed is full.

In less than an hour, the 2 studio raised beds have been made.
Another hour later I had them all planted in pink, white and purple spring bulbs. I want to see some colour come spring. I will probably move the bulbs elsewhere later because spring bulbs alone don't make a self-supporting ecology of plants.
Ron is spreading foundation gravel for the path under the arcade.
It was an excellent morning's work on the Backyard Project.


Friday, January 15, 2016

Backyard Project: Transplanting, Building, Shovelling, Back-filling, Capturing

Some of the transplanted plants we wanted moved to other garden beds around the house to fill in gaps.

Tom scooped them up one at a time and put them in our little tractor trailer.
Ron and I planted each plant in a pre-planned flagged spot. 
We had to work fast to keep up with Tom.

While waiting for us, Tom built a small rock edge between Gunilla's garden and the track.


Tom had dropped a pile of soil as far back beside the studio as he could reach.
It made Ron's job a lot easier.

Ron is back-filling over the studio's gravel-covered perimeter drain. 
It took many wheelbarrows of soil but I see he is still smiling.

At the same time, I was supposed to be in my studio working. With all of that activity going on outside the window I didn't work very well. I constantly went outside with camera in hand to see what was going on. It was all so exciting and I couldn't believe how quickly tasks were being done.


Thursday, January 7, 2016

Backyard Project: Continuing with Scheduled Tasks

Task 4: Ron secured a line to the pontoon in the middle of the pond. Tom attached the end  of the line to his machine and pulled the pontoon to the edge of the pond. Ron is now cutting up the pontoon. I'll tell you more about this project later.

Sorting and Staging Materials
Tom has to always think ahead so as not to box his machine in behind his work, to not have materials in the way of where he needs to work next and to have easy access to the materials he needs.
Here he has sorted into piles transferred plants, decayed wood, a collection of found rocks and logs.


Tom scoops up a plant that has spent the summer in the temporary garden bed after being moved out of the studio footprint.

The large bucket is able to carry so much soil with the plant that I think some of the plants hardly notice the move.

The native plants are transplanted to Gunilla's Garden.

This is the last remnant of the garden bed that made way for the studio. Miraculously these plants survived the construction. Tom scooped them up and put them in Gunilla's Garden too.
While all of this activity is going on I am supposed to be in my studio working but I am fascinated by all that is going on and spend most of the day out on the porch watching and taking photographs.

Wednesday, December 9, 2015

Studio Design - Pattern Language #159 Light on Two Sides of Every Room


Pattern Language #159 Light on Two Sides of Every Room
Problem - ' When they have a choice, people will always gravitate to those rooms which have light on two sides, and leave the rooms which are lit from only one side unused and empty' p. 747. 'In rooms lit on one side the glare which surrounds people's faces prevents people from understanding one another' p. 748-9.
Solution - 'Locate each room so that it has outdoor space outside it on at least two sides, and then place windows in these outdoor walls so that natural light falls into every room from more than one direction.' p.750.
There is a step down into the sunny room where I go to read, stitch, have tea and contemplate. 

It has windows on 3 sides that look out into the forest.

Stitching Corner
'This pattern, perhaps more than any other single pattern, determines the success or failure of a room.' p. 747

My friend comes and joins me in the room for tea every day or so. Notice how well lit his face is.
'The importance of this pattern lies partly in the social atmosphere it creates in the room. Rooms lit on two sides with natural light, create less glare around people and objects; this lets us see things more intricately; and most important, it allows us to read in detail the minute expressions that flash across people's faces. the motion of their hands.... and thereby understand, more clearly, the meaning they are after. The light on two sides allows people to understand each other.' p.748

The light had been perfect for stitching until the longer winter days. I have now brought in a floor lamp and Ron has put a higher wattage bulb into the overhead ceiling fixture.
Apart from that, the room is working very well and is such a lovely place to be in.


Thursday, November 26, 2015

Studio Design - Pattern Language #200 Open Shelves, #201 Waist-high Shelf

'A Pattern Language' by Christopher Alexander is a collection of patterns found in well-designed living spaces. I applied many of these patterns to my studio design.
Pattern #200 Open Shelves
The Problem - 'Cupboards that are too deep waste valuable space, and it always seems that you want what is behind something else'.
The Solution - 'Cover the walls with narrow shelves of varying depth but always shallow enough so that things can be placed on them one deep - nothing hiding behind anything else.'
I measured the depth of some of the books and binders I wanted to have in the studio and used that measurement for the depth of the shelves in this bookcase. Likewise in the rest of the studio the shelves depths and the varying spaces between them match the sizes of the articles stored on them. Things are stored only one item deep, mostly.


Pattern #201 Waist-high Shelf
Problem - 'In every house and every workplace there is a daily "traffic" of objects which are handled most. Unless such things are immediately at hand, the flow of life is awkward, full of mistakes; things are forgotten, misplaced.'
Solution - 'Build waist-high shelves around at least part of the main rooms where people live and work. Make them long, 9 to 15 inches deep, with shelves or cupboard underneath. Interrupt the shelf for seats, windows or doors.'
The 12" top of the bookshelf doubles as the needed waist-high shelf where stuff gets put. It also serves as the protective back for the Drawing Centre. Papers won't blow off the desk when the front door is opened.


Drawing Centre
This is where I put the cork mat I made from leftover floor tiles that didn't work on the cutting table. The area is big enough to hold a portable sloped drawing board that I use when doing design work.

Desk Centre
Attached to the Drawing Centre is the Desk Centre and both share the one chair. Underneath there are 2 basket stacks on wheels stored in otherwise unused space. Art materials are stored here and easily accessed from either work area.

Desk Centre
Each morning after I enter the studio, I start work here with some drawing practice and writing in a journal. These 2 activities slow me down and make me focus on what I plan to do that day. I end a studio session here too. I write in the journal  and plan what I will do next day.
Whenever I need extra horizontal workspace I can easily clear off these few things and temporarily free up a large area.The simple L-shaped design gives a lot of flexibility in how the space can be used. 


Monday, November 23, 2015

Studio Sewing Centre

While making pillow covers from molas, I also used the Sewing Centre.

View from the front door looking at the Project Table and Design Wall.
The Sewing Centre is to the right.


The Sewing Centre is basically the same setup I had in my old studio. It worked and I couldn't come up with a better solution until I had worked in this new space for a while.

The sewing table was a daughter's desk I seconded when she left home. It is large and works well.
For my birthday, I have asked for a new sewing chair. It was a used chair when I got it and I have recovered it twice, but now the foam is disintegrating. I need a chair in a desk area I am setting up in the house so this one can go there.
In an otherwise dead corner under the table is a tiered basket on wheels with all of the tools and equipment for sewing.


I like old 50s to 70s government issue furniture. It is usually well worn and very functional. This old map cabinet is where I sort and store stabilisers only a chair swivel away from the sewing table

A 2nd table holds the serger/overlocker. It can easily be moved to the top of the stabiliser/map cabinet when I need to work on the embellisher. They are both light machine and easy to lift into place. I don't use them as often so it wasn't worth the real-estate to give them each a table.
The one chair works with both tables.

Over the cabinet is a window with a view of the forest. It lets in soft south easterly light and keeps me in touch with what is happening outside.
One thing I have been disappointed with is 2 birds have flown into the front windows of the studio. I had thought the lower porch roof would stop them from thinking it was a place to fly through. Hopefully, once the plantings in front of the studio are in this will happen a lot less.

From the Sewing Centre, I walk along the design wall to the back of the Project Table to shelves with boxes of machine threads. No natural light can reach them so they are protected from fading and premature ageing. 

Mola - detail
The old Sewing Centre still works in its new location so I guess I won't be changing anything in the near future. But I will continue to look out for design ideas to improve the space.