Home

Thursday, March 26, 2015

Studio Construction: Framing Begins

A delivery of framing material...

...is offloaded.

The framing begins.
A milestone day.

Backfilling around the foundation walls.

The front pile of dirt came from the site excavation.
The back pile is the top soil that was lifted off first and kept separate. It will be used to make raised garden beds in front of the studio.

I have been given a job - moving all of these decorative river stones if I don't want them covered during the digging of trenches for the service pipes going from the house to the studio.
I have plans for these stones in the big Back Yard Project so I am keen for them to not be covered with dirt. Over the next few weeks, with a friend helping, we moved all of these stones, and there are more behind, to piles, out of the way.
I heard it said this job was 'grunt work.'

So it was mainly framing and backfilling this week.


Studio Construction: Flooring

Here is one of the project owners checking out the installation of the floor joists.

Another advantage of the concrete filled foam block foundation is that it is a bearing wall, meaning it is strong enough to hold the floor joists and floor bearers are not needed - another saving in materials.

The building was designed to be narrow enough that the single span floor joist can be supported by the wall down the centre of the crawlspace. No extra support is needed.
Here is Dave, the lead/head carpenter on the job, attaching a perimeter board to the floor joists.
Next he and Jeff secured plywood on top of the floor joists making the first layer of the main room floor.

One day I came home from a meeting to find this. The first wall was assembled while lying flat, then somehow raised and secured. 
Now it is really beginning to look like a building.
That is rain on the camera lens, not snow. It continues to fall making the site muddier and muddier. The backfill soil is too compacted and saturated for the rainwater to percolate through it so the water accumulates in puddles. Ron went out with a shovel and pick to make channels for the puddles to flow down the hill, away from the construction site.


Tuesday, March 24, 2015

Studio Construction: Lots of Activity


The crawlspace floor has set. Here I am trying it out, standing directly below where my irons will be set up.

Other activities continued over the week.
Henry, a water and airproof sticky membrane, was stuck to the outside of the concrete foundation around the back of the building.


All of the formwork timber had nails pulled out then was stacked up ready to be used again on another job site.

Early one misty morning a slinger truck arrived on site.

A wet gravel mix was slung behind the building.

It was used to support and cover the building's perimeter drains. It will keep any water draining away from the building to keep the foundation dry.
We have had a wet week, but the work continues.

Wednesday, March 18, 2015

Studio Construction - Crawl Space Floor


Early on a frosty morning a pumper truck arrived on site.

Not far behind was a concrete truck.

The 2 trucks connected. 
The guy high up in the control area directed the flow of concrete to the pump truck.

Meanwhile, a specialised concrete crew had arrived.

It was like watching a ballet as they worked quickly together to get the flowing concrete pumped out and leveled before it started to set.

Then they smoothed out the concrete with various blades and levelers.


Once the concrete had set to a specific firmness it was polished with a hovering machine then left to dry.
And that is it. The smooth crawlspace floor is finished. It doesn't need any further finishing with more materials. The concrete is designed with more than 1 purpose - it is part of the foundation of the building and it is the finished floor.
Concrete is a 'green' material in that it is largely a mined resource and only lightly processed. Once set there is minimal off-gassing which decreases as it ages. It is permanent. 
If the building is well designed it is likely to be in place for a long time without major changes.
 If the original construction is done well there will be minimal maintenance costs over the life of the building.  
 The concrete floor's durability, long life expectancy and ease of maintenance qualifies it for a high Life Cycle Assessment (LCA). LCA is an analysis of something over its entire lifetime.


Monday, March 2, 2015

Small Expressions Show, Tulista Gallery, Sidney


Synesthesia #4 Spring Green

I have just spent the day working in a team to install this year's 'Small Expressions Show' at Tulista Community Arts Centre, Sidney-by-the-Sea, BC. When we left the gallery late this afternoon all of the work  was in place and looked so inviting. It looked like a place to spend a couple of hours absorbing what it means to be creative.
Synesthesia #5 Green
The vibe on the Pacific Northwest coast attracts those who want to express their creativity actively. This is particularly so in the town of Sidney and on the Saanich Penninsula where there are literally hundreds of artists living within a small area working in every media.

Synesthesia # 6 Blue Green
The catch with this exhibition, Small Expressions, is every work has to fit within the limitations of being 12 x 12 x 12 or less. For some artists, this is their norm. For other artists, it is a challenge and often the results are surprising. A different side of their creativity surfaces.
This is my 3rd Small Expressions exhibition. I am continuing to show work from my Synesthesia series. The 3 above images are of the work I have entered this year.

Synesthesia #24 Golden Yellow
I entered the above and 2 below works last year.
Synesthesia is a series expressing how I feel the energy of different colours. They are sensing drawings in fabric and thread. I have made 10 and plan to make 24.


Synesthesia #23 Orange Yellow
Tomorrow we meet at the gallery to put up labels and to do the tweaking and tidy up until everything looks perfect.
The exhibition opens Wednesday March 4th, from 10:00 to 4:00pm. I will do my first shift that morning. Every artist who is able to sits with the show twice over the month. The exhibition closes March 29th. The gallery will be open every day except Mondays.

Synesthesia #22 Yellow-orange
The Small Expressions Show is just one of a great many different exhibitions, activities and programs under the umbrella of the very active Community Arts Council of the Saanich Peninsula (CACSP). CACSP is one of the 90 regional arts councils in British Columbia whose mandate is to nurture an appreciation of all the arts on the Saanich Peninsula.


Sunday, March 1, 2015

'Edge of the Forest' Opens

The first exhibition of the Canadian Surface Design Association's 'Edge of the Forest' opens in the 

 Richmond Hill Centre for the Performing Arts. Richmond Hill

 It is up for all of March. There is an opening reception on March 11th.

Here is the rest of the schedule, to date: 

April 20-May 4th, 2015 –  Art Square Gallery Toronto

June 4-July 9, 2015 – Exhibition at Parrot Gallery Belleville, ON

August 15  – October 18, 2015 prior to & during Fibre Arts 2015 Conference, Woody Point, NL


The aim of this juried fibre exhibition is to present a survey of work currently being done by Canadian members of the Surface Design Association

Here is my entry.

'Forest Reliquary' 2014 

Materials: Vintage cotton table cloth, earth pigments, cotton thread, leaf skeletons, deer bones, maple tree samaras, fern spores

Techniques: Earth dyeing, spore printing, hand stitching (furrowing, whipped double running stitch, attachment).


Currently, I am using domestic linens and earth pigments as I explore the biological processes in the Pacific North West rainforest. 

I will be teaching a 2-day, weekend workshop on using earth pigments at the Metchosin International Summer School of the Arts 2015 MISSA June 27 - 28 this summer. Do come and join us if you are interested in learning about working with eco-friendly earth pigments and need a little MISSA Magic in your life MISSA


Saturday, February 28, 2015

Studio Construction - Crawlspace Floor Prep

I don't know if you noticed in the previous post the pile of rusty metal mesh.

I noticed it and put a few pieces of vinegar-soaked cotton between the layers.

Even though the mesh was needed a few hours later, it did leave some worthwhile rust marks on the cloth.


The metal was needed to make the crawlspace foundation ready for the floor. 
Sheets of foam were laid down to insulate the floor against the cold soil. 
A water barrier was laid on top of the foam and sealed with tape. Remember, 'no rising damp' wanted here.
Next rebar (lengths of strong steel) were attached to the foundation wall and protruded out into the crawlspace floor area. This looks like where some strength is needed. I forgot to ask about this feature. 

Here is Jeff cutting the metal mesh to fit and cover the crawlspace foundation area.

Here is the foundation crawlspace ready for the concrete floor to be poured.


Monday, February 23, 2015

Studio - Construction - Crawlspace Foundation

It is always exciting when I look out the window and see yet another big truck arrive. What will it be doing today?

This one backed up close to the construction site then extended out the back a movable conveyor belt.

The driver stood on the crawlspace foundation and operated a remote controller. He directed a chute with a wet gravelly mix onto the floor. Dave and Jeff are ready with rakes in hand.


Jeff spreads the mix out to make it even.

Then he works a compactor over it to make it hard.

Here is the crawlspace foundation ready for the floor to be installed.

All of this concrete will act as a heat sink as its mass will slowly absorb heat over the summer. It will slowly release that heat over the winter. That stored heat will radiate upward into the studio where and when it is needed, i.e. to keep me warm while I am working.
The orientation of the building and the shape of the crawlspace floor is designed to follow the contours of the land. Minimal digging was needed for the foundation and the building will fit snuggly into the sloping site.


Friday, February 20, 2015

Studio - Construction - Foundation Insulation

Here is Jeff adding insulation and waterproofing to the wall down the centre of the crawl space. There is a black sticky waterproof layer between the foam and the concrete. Concrete is porous. It needs a waterproof barrier to stop water from wicking up from the ground and out of the sides of the wall and into the crawl space floor.
Concrete is strong but it is a poor insulator. Jeff is nailing closed cell insulation foam panels to the interior wall to stop the cold from the ground working its way up the wall and out into the crawl space.


This is the crawl space floor drain. The hot water tank will be located directly under the sink, in the crawlspace. This drain is a safety feature, in case the hot water tank fails.


A roll of fabric on a construction site? Who knew?

But before I could think of how I could use this fabric it was being put in place under the perimeter drain pipes. Its job is to stop plant roots from growing into the pipe in search of water then blocking the drain.

I hear lots of power tools being used throughout the day, but the hammer still seems to be the carpenter's main tool.


Tuesday, February 17, 2015

Studio - Construction - Foundation Waterproofing

In a previous post, I showed the foundation being poured between foam Lego blocks, here
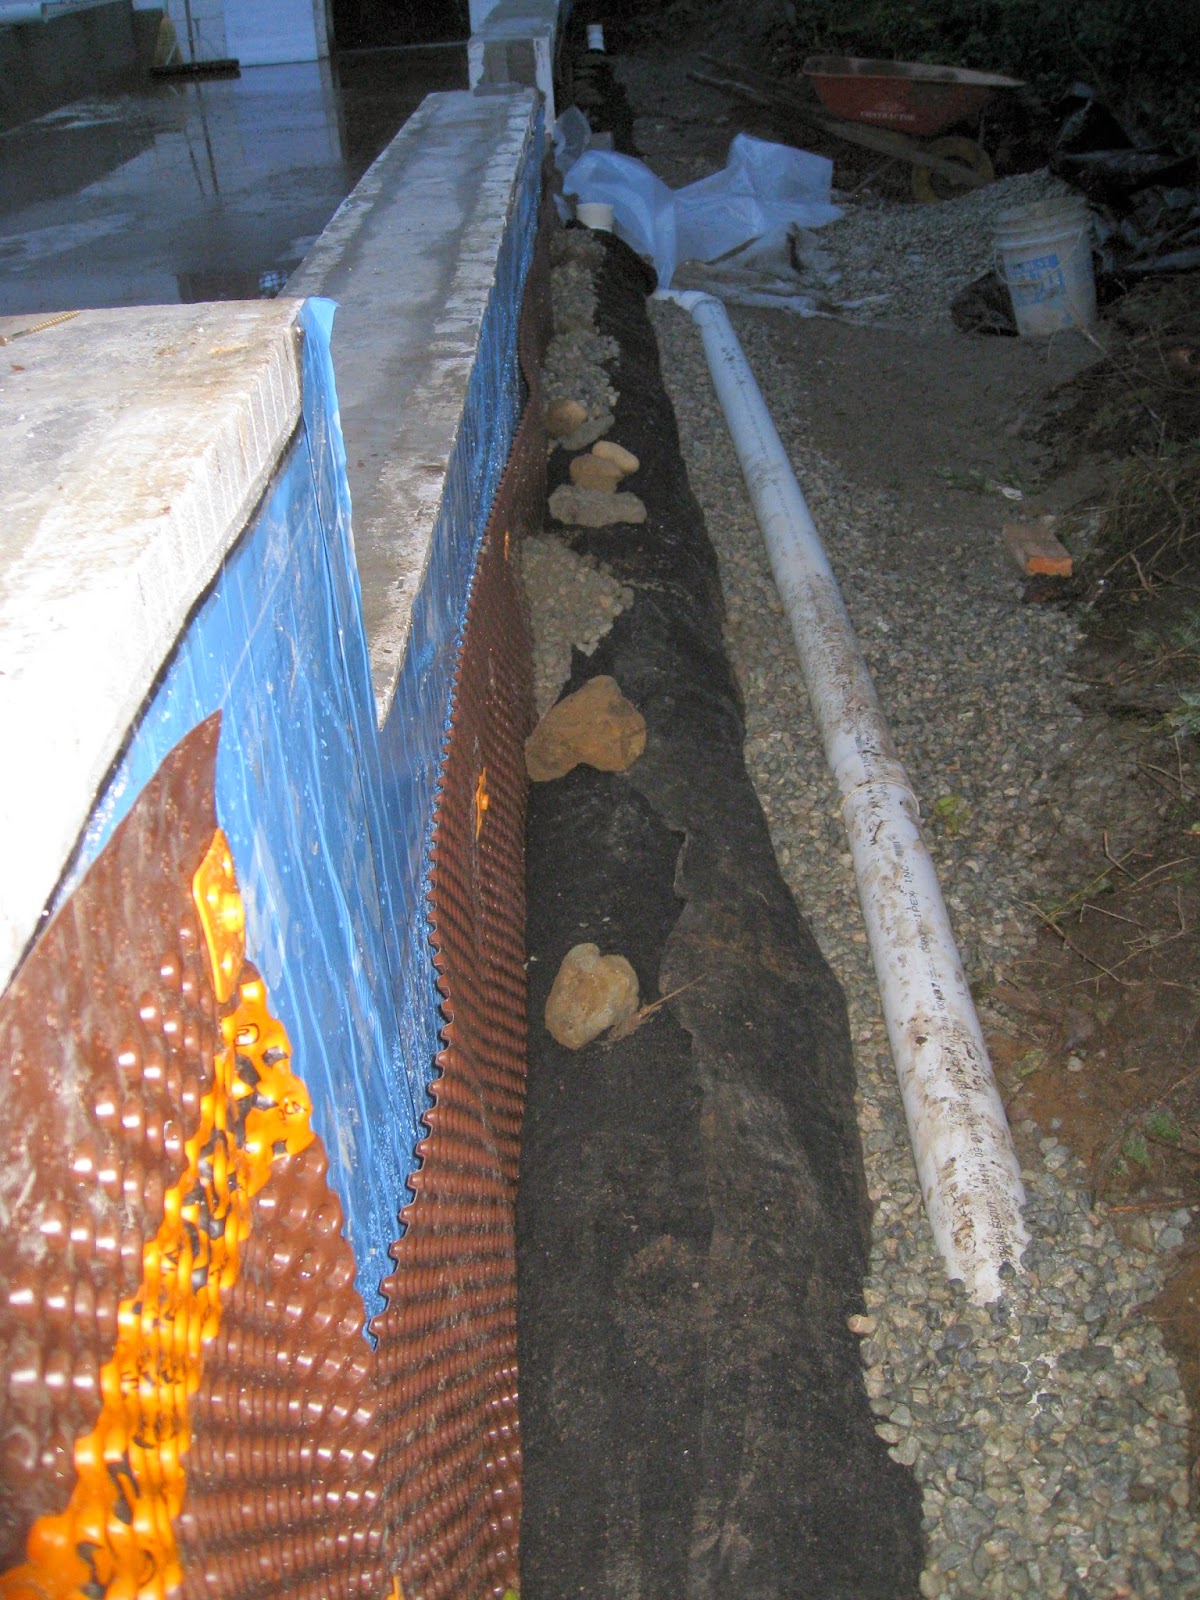
The next step was sticking a waterproof membrane to the outside of the foam blocks - see the blue layer above.
Next the foundation wrap, Delta - MS, was rolled out and nailed in place with orange fasteners that fit into the dimples with a nail driven into the centre.
The black mold strip is yet to be installed on top of the brown foundation wrap.

The wrap is rolled out on the outside of all of the foundation walls.

Here is a diagram from the roll wrapper showing how it protects the foam once the backfill is in place. The dimples channel all water away from the wall and down to the drain at the bottom of the foundation keeping the basement dry. There will be no 'rising damp' in this basement.

Here is the basement wall with its 2 waterproofing layers. An important feature of any building in a rainforest.

A carpenter's tools.