Home

Thursday, September 24, 2015

Circumnavigation: Things To Do When Not Actually Sailing

Sketching in Roller Bay, Hope Island

Roller Bay, so named because the round stones roll in and out with the waves making such a distinctive noise.

Picking up debris on what should have been a pristine beach. I collected a bag of stuff to incorporate in a work about the world's plastic garbage issue.

And there was always knitting when not required by the skipper to pull my weight.

Sunday, September 20, 2015

Vancouver Island Circumnavigation - What I did this Summer

This summer Ron and I went on a big expedition. We explored the island we live on.  Travelling on our sailboat we took a month to circumnavigate Vancouver  Island.

We saw many beautiful sights including much wildlife: orcas, dolphins, sea lions, whales, sea otters, seals, bears, and birds - none of which I was able to capture adequately with  my point 'n' shoot camera.

I got lots of knitting time in. I read most of the books I stowed on board.

I did lots of quick sketches to make me really see what I was looking at.
My sketchbook is full of inspiration and ideas for future works which will keep me busy in my studio over winter.


Thursday, September 17, 2015

Kim Eichler-Messmer Dye Workshop

For a couple of years now I had been wanting to attend Kim Eichler-Messmer 's Percentage Dyeing Workshop so I signed up straight away when I saw she was coming to the Pacific Northwest Art School in Coupeville, Washington. (Check out  their just published 2016 calendar)

Kim practices and teaches a percentage system that makes it possible to reproduce colours exactly. 
Day one focused on mastering the basic system of weighing the fabric then adding precise amounts of dye from stock solutions. 

We each made 2 sets of our basic palettes, one in dark values and one in light values. We used these two sets as a starting point for all of the following exercises.

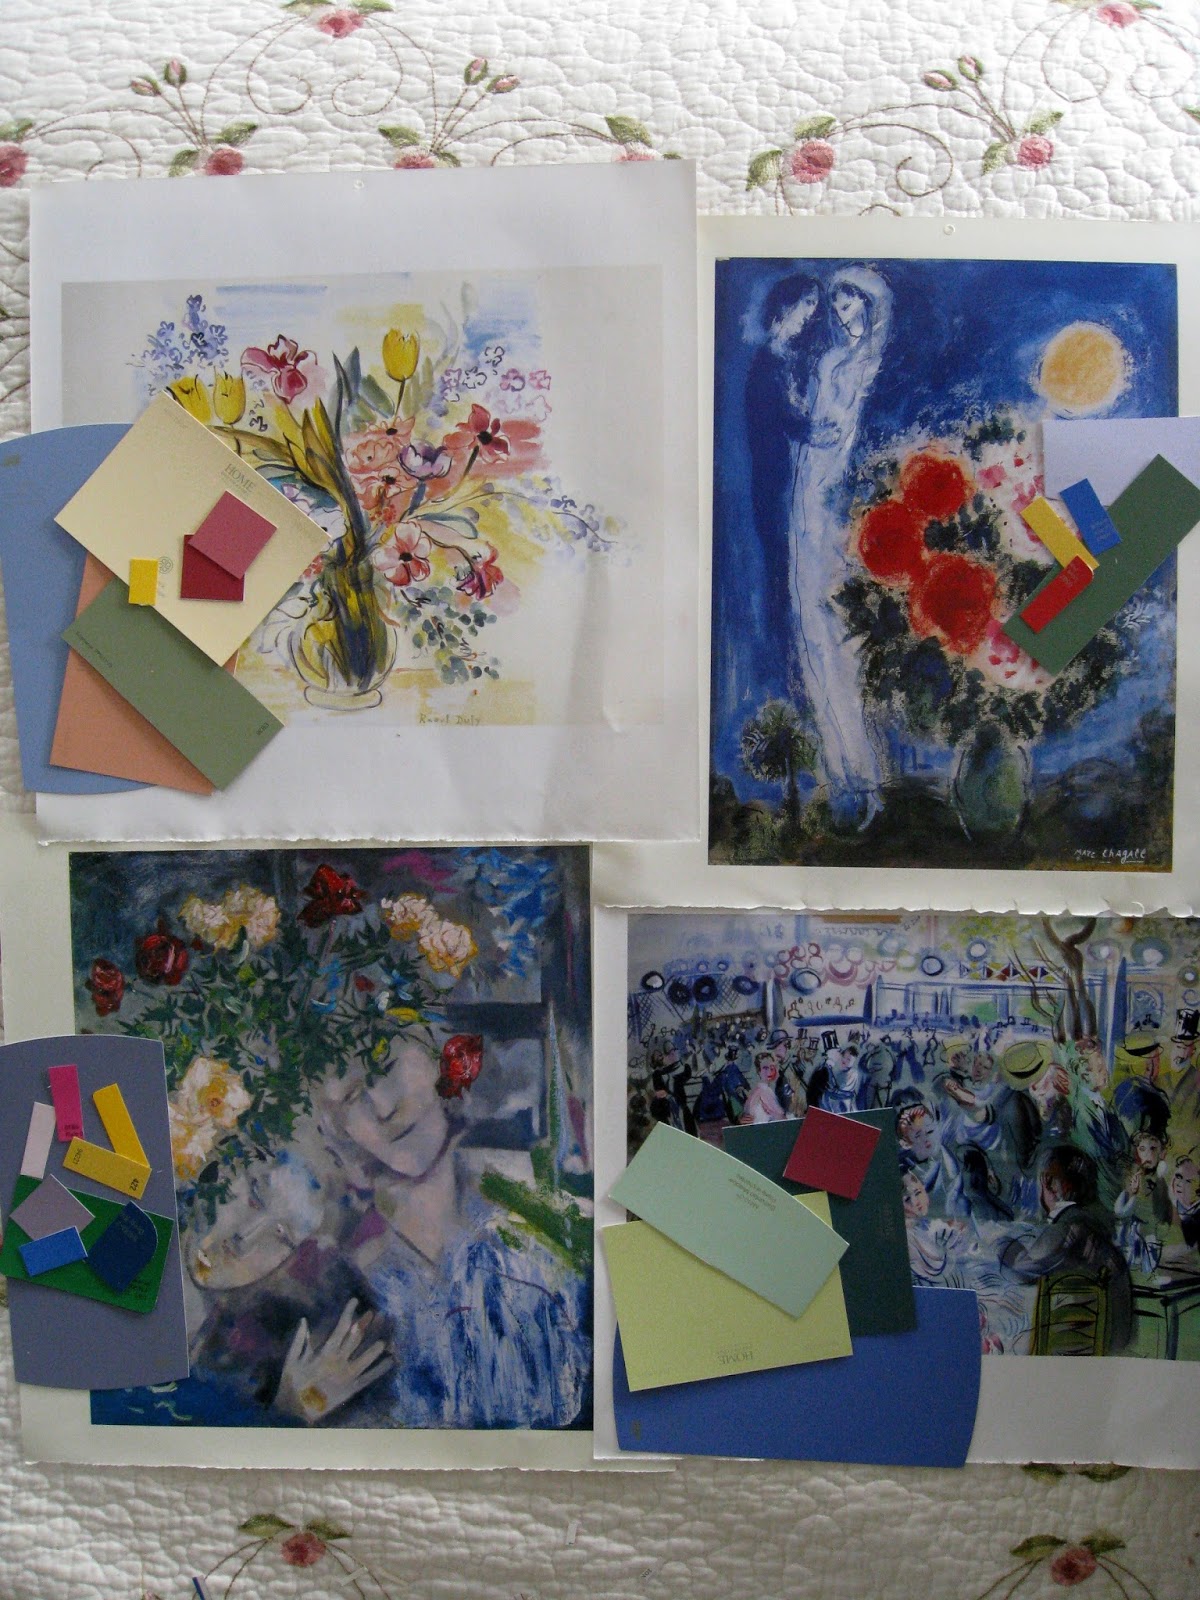
Homework was to find some favourite images and isolate 4 to 7 of the most important colours in each of them. Next day we sifted through a huge pile of Kim's paint chips and the ones we had brought with us to find colour matches with our chosen images.


Then we set about dyeing white fabric to match the colours in our chosen images. 
That was a fun exercise and a most valuable skill to learn.
We also learnt how to made many different types of colour gradations.


Each person cut up their samples and shared them with everyone else. We left the class with a big bundle of samples and instructions on how to reproduce each one.

I rewrote all of the recipes into a new dye notebook, numbering each one to match with the unique number on each sample. What a valuable resource that I can keep adding to. 
I used to dye lots of fabric in  a haphazard, non-repeatable way then pick from the fabric pile the colour I was looking for. Now I know how to dye to replicate any colour, make a value gradation, from the palest to the darkest, produce a 2-colour gradation going from bright to neutral with no change in value and how to scale up to any quantity of fabric with consistent results. No more random dyeing for me.
Thank you, Kim, for  teaching an invaluable technique with infectious enthusiasm, never-ending patience and a great depth of dye knowledge. 

Monday, September 14, 2015

Studio: Open House

Friday Preparations
Daughter Katherine set up the studio for serving food and drinks.

Son-in-law Sebastian cleaned the windows inside and out....

...then joined Ron in spreading mulch over the rough construction ground in front of the studio.

Having a well-earned rest.
Daughter Elizabeth and boyfriend Cody arrived the next day and were in charge of drinks.

Late Friday Afternoon
The studio is ready.


Saturday Open House
Guests came and went from 10 until 4. 
Kristen, Laura and Judi.

Having friends over to celebrate the official opening was a wonderful way to begin using my new work space. It is now full of good vibes and best wishes.
Now to get in there and work.

Thursday, September 10, 2015

Studio: Sorting, Organising, Cleaning

I have been very busy these past 2 weeks setting up my new studio. Each item I touch I make the decision to keep it or not. If it is to be kept it gets cleaned, organised then stored.
I have decided to store things in used paper and cardboard, like these grocery bags for painted papers.


I raided a shoe store's supply of empty boxes. I think the owner was pleased he had fewer boxes to flatten after I left. Yes, it does look like a shoe store but it is a most convenient way to organise my many collections of precious things.


Collections that I use more often I arranged in cut off boxes. I can easily take the whole box off the shelf to a table to find exactly what I need.

Fabrics and threads continue to be stored in clear (mostly) plastic containers. I went through every bin throwing out what no longer interests me. My fabric and thread collections are organised into a bin for each colour.

The shelving cardboard is being used to extend the new garden bed. When the paper and cardboard containers wear out they too will be added to the garden to make lasagna soil.
With my family, we are hosting an open house to celebrate the completion of the Green Shed. There is nothing like a deadline to keep one working hard. I am enjoying getting reacquainted with everything I have to work with.

Saturday, August 29, 2015

Studio: Loading Up

The studio is ready to be 'loaded up.'

The first step is to assemble the shelving, but I need to also have the stuff to go on each shelf ready to show where to place each shelf, working from the bottom up. This procedure makes the most of the shelving space.

We took the furniture from the old studio that I wanted to continue using out to the new studio.

Good friends JP and Caroline McCartin came to stay for the week and we put them to work. They willingly made all of the trips between the old and the new to move all of the containers and furniture.

Ron and JP leveled off table tops...

...and assembled shelving while I loaded them up.

Caroline got into the cleaning...

... getting into spots I couldn't reach.

Caroline pulling herself out of the fabric-roll storage.

Caroline cleaning my bead storage unit.

Caroline and I spent the afternoon making a print table board - a two person job for one this size. First we joined two pieces of closed cell insulation board with duct tape then trimmed the board to 8' x 4', the size of the table. We taped on a sheet of cardboard from the steel shelving packaging to give the insulation some strength. This was wrapped in a king-sized wool blanket trimmed and sewn to make a snug fit. The final layer was a wrap of heavy plastic. I am very excited about being able to print to this size.
Big thanks to Caroline and JP for working so hard at transforming an empty space into something looking more like a studio.

Wednesday, August 26, 2015

Studio Construction: Complete - Moving Sale


The Green Shed passed its final inspection. We have the building permit.

Ron and I celebrated with a soft (bubbly) opening.

Inside the little box is the front door key.

The fire chief dropped by and gave his final approval.
I have been told I can now "load it up."

So I am having a 'Moving Sale' in my Etsy shop Ravenmade Works
I want to sell some of my stock to save on the 20-step walk between my old studio and the new one. Isn't that what shops do when they change location? 


I am offering a 40% coupon discount for the next couple of weeks.
The Moving Sale coupon code is MOVING40

Now to get to the task in hand - loading up.

Monday, August 24, 2015

Studio Construction: Design-Inspiration-Photography Walls

With just a few more things to do in the studio I started the serious cleaning up of construction dust.

Mike is preparing the base for the design wall - fibre board and cork...

...with a layer of blackout curtain material added on top. The rubberised coating does an excellent job holding the pins.
I steamed out the wrinkles before it was attached to the wall.


The sliding door is put on a barn door railing.

I
In this position, it will be used as an inspiration board. It is next to the sewing station where I can pin up samples to see what they look like when placed vertically and from a distance.

When the door is in this position it becomes my photography wall where I can document works in progress. I can step way back between the furniture to check on the work from different distances.

Here is the design wall before the blackout cloth is attached. The wooden frame is screwed in place so it can be taken off easily when I need to replace the worn out blackout cloth. I have had my current design wall in use for 6 years and it is not showing any signs of failure. But I am designing for 25 to 30 years of use before anything inside or outside the studio needs to be replaced. Fittings, fixtures and materials have been placed so they can be easily replaced without having to a major reno of anything else.