Home

Saturday, November 5, 2016

Teasels - a cloth worker's tool.

This year's teasel harvest

I refreshed the teasels at the front door. 
This is my shingle.


elserine is a weaver. 
During a Vancouver Island Surface Design Assoc meeting elserine demonstrated how the teasel was/is used to full woven or knit garments to make them soft. Gently stroking the cloth with a tied teasel bundle raises the nap. Commercially they have been replaced by steel combs but some woolen workers continue to prefer to use teasels because they are kinder to the cloth, the teasel hook breaking when meeting resistance and so avoiding damage to the fibers.
In parts of the USA, the teasel is considered noxious because it out-competes native plants. I have noticed teasels grow where soil has been disturbed and damaged so I consider them 'band-aid' plants. They have long tap roots capable of bringing minerals up from lower soil levels to the surface and they produce a lot of stem and leaves which are useful for the 'chop and drop' permaculture method of soil building. As the plant material decays, it releases organic matter and minerals into the soil making them available for other plants.
In our garden, I believe the teasel will serve its purpose until soil conditions improve and the plant is no longer suited to the site and its seeds, with a two-year viability, will no longer germinate. 


Wednesday, November 2, 2016

Backyard Project: BOOM. DONE. AGAIN.

After the rock was broken up on the first site the blast mats were removed and moved to the second site.
This first site is where a tool shed and a garden shed are to be built, beside the garage.

Aaron carefully lifted the mats over the Gravel Bed garden without damaging anything.

Then tracked along the path around the Gravel bed garden to position the mats on top of the second explosion site.

This is the wire that links to all of the drilled hole full of explosive and wire. It is long so the Powder Man can step well away from the site before he pushes the button.

BOOM. DONE. AGAIN.


This is the second site after Aaron removed the blast mats and dug up the broken rock with his digger. As a friend said, "Now to deal with the bits." Yes, it will be a chore but I have plans for them, according to their size. When I told Aaron this he said, "Why am I not surprised?" I have no idea what he meant.
This site had a small mound of granite preventing it being made into a level ground for the construction of a pergola. Now that problem is solved the construction of the structures can begin.

Sunday, October 30, 2016

Backyard Project: Finally the Powder Man

The next step in the blasting process was the arrival of this machine to move the blast mats to the blast site. 
The driver is Aaron Yager, Yager Construction, the owner of the construction company working on phase 3 of the Backyard project. They also worked on phase 1 of the Backyard project - the construction of The Green Shed, my studio.

Another vehicle drove up the back track and put out these serious looking signs, one out next to the road and the other a flip-down one on the vehicle.

This is the explosive powder, urea nitrate. 
It can also be used as a fertiliser!

The blast mats were stacked beside the rock to be blasted.

This is the lump of granite that needs to be reduced so we can build on it.


This is the Powder Man and his assistant. Here he is using a steel rod to push what looks like string down into the previously drilled holes. His assistant is taking all of the strings and twisting them together.

The Powder Man pours a measured amount of the powder into each hole. Next, the blast mats are stacked on top of the rock. We all stand well back. The warning signals blast out.


BOOM. DONE.
This is the tagline of the blasting company. I love it because that is exactly how it happened.

Tuesday, October 25, 2016

Backyard Project: Next Came the Driller

The driller drove his specialised, high-tech machine right up to the blast site.
He used a steel rod to measure distances before spraying a circle of orange paint.

He put on ear protection then began to operate his machine.

Over each circle, he drilled a hole into the rock. It was so noisy and dusty. The windows and walls of the house were getting covered in a fine dust. I rushed to close all of the windows but Ron knew what was going to happen and had closed the house up before me.

He moved his machine down to the second area to be blasted and drilled.
I was pleased to have confirmed the paths I had designed were indeed wide enough for smaller vehicles to travel along.

The driller inserted a red plastic cup into each hole

Then he left, with his machine.

He left behind two piles of finely ground granite where he emptied his machine. I gathered up this dust and sprinkled half of it on all of the new garden beds. I figured it was so finely ground it wouldn't take too long for the plants to be able to access these in-situ minerals.

Sunday, October 23, 2016

Backyard Project- Preparing for Blasting

Much excitement.

A truck backed up the back track with a most unusual load.

Old rubber tires have been threaded together with steel cables and secured with metal brackets and bolts.

HHS Drilling and Blasting had arrived to prepare for the blasting needed to be done before the next phase of construction could begin.

It was another one of those specialised, high-tech vehicles. This is command central tucked under the heavy duty hoist. The first task was to lower the stabilising legs on either side of the truck.


Next, the driver hung the remote controller from his neck and proceeded to unload the very heavy rubber mats.
Then he left.


Thursday, October 20, 2016

Backyard Project - August, Finally the Rock beds are Flourishing

After working out the bugs in the soil were thriving under a thick layer of straw mulch and eating every sprouting seed, I removed the straw mulch and planted a third lot of seeds. By August those beds were covered in thriving plants.
These purple snap bean plants were most prolific and delicious, along with a yellow variety.

Fava/broad beans matured later and grew tall but I didn't bother staking them.

There were also scarlet runners that attracted insects and hummingbirds to their flowers.

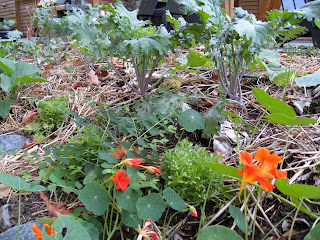
4 different types of kale and a border of mesclun garnished with nasturtium flowers and leaves have kept us in salad greens for 3 months so far. 

The comfrey grew back quickly after its last cut back. I will cut it back again giving it a chance to grow some before the winter and colder temperatures set in.


The globe artichokes and a number of different squash were planted because they grow large and will provide lots of biomass to the soil when dug in. I'm not sure the growing season will be long enough for the squash to mature but in the meantime, they are certainly growing large leaves and trailing along the beds protecting the soil.


I planted 4 different types of potatoes. After a potato patch had been harvested I covered the remains with a thick layer of straw to encourage the soil organisms to get busy at what they do best - making soil.
These green mulch crops have been most successful and the food harvest has been an added bonus.


Monday, October 17, 2016

Horticultural Centre of the Pacific - a regular haunt

The Horticultural Centre of the Pacific is many things and there are many reasons to visit. Ron and I have been members from the first year we arrived on the island and we continue to visit for different reasons.

This visit focused on studying the Butterfly and Insect beds. I was looking for plant ideas for the Water Drop Insectary and Feather Bird Haven hugelkultur beds in our Backyard project

Hmmm... there is a possibility - Amaranth - red to attract hummingbirds, seeds for fall bird feed and it is a dye plant. I am particularly interested in multi-functioning plants.

The Butterfly and Insect bed is right next to the Plant Sale Centre. I whipped out of my bag my plant lists, gave one sheet to Ron and we searched for wanted plants. There was nothing that day but next visit I may find enough to fill the car.

Since I have been building a number of different types of stone walls for the Backyard Project I have been noticing stone walls everywhere. This is one of my local favourites.
We stopped in for a drink at Charlotte and the Quail Cafe before leaving knowing we would be back for the upcoming Fall Plant Sale.


Wednesday, October 12, 2016

'Earth Repair' - 3 Years Later

2014
3 years 3 months after the emergency while living outside wrapped around the Indian plum I brought the 3 afternoon tea cloths inside. 
They were carefully washed, dried and ironed. I was hoping the laundering had stopped the decay processes.

There is much staining and decay and large holes had appeared.
How to preserve this cloth? The usual way to repair a cloth is to darn it but the whole cloth is in such a fragile state didn't think it would support darning. Another way to repair cloth is to add a patch. When I thought about it, adding patches is the way the soil is repaired each year. Leaves fall from plants and trees and cover the soil. Organic processes work on breaking down the leaves to return them to the soil.

I was thinking about this soil repair idea when while out on a walk I noticed the Tulip tree had a skirt of leaves reflecting the shape if its branches. It was using its leaves to replenish the soil it grows in.

I looked more closely at those fallen leaves and saw the majority had decayed in such a way that only the veins were left. They were leaf skeletons.

I collected them up and soaked them in water to remove the soil and pine needles.

I left them to dry.

They are quite lovely in their fragile state. I had this idea to repair the tea cloth with these fragile leaves. I hand stitched leaves directly onto the cloth over the holes. At the top of the cloth I stitched a row of eyelets, wove a jute string through them and inserted a stick I found near the Tulip Tree. 
The cloth hung on my design wall for the year, still too delicate to do anything with.

2015
When the Tulip tree was dropping its leaves again the next year made me look again at the still fragile afternoon tea cloth.
I wanted to add more leaves but I wanted to make the skeletons stronger while still appearing fragile. It was time to sample. I coated leaves with various mediums but they tended to fill the holes and look a bit shiny. I ironed on a fine fusible web. I liked the look.  

I added the bonded leaves but I couldn't iron them in place. I decided to machine sew them in place using the finest thread I had with the finest needle.  I liked what was happening and decided to add another layer of leaf skeletons next fall.

 
2016
I added another layer of bonded leaves using a combination of hand and machine stitching.
The cloth with its leaves was stronger looking but getting very dried out and brittle. I added a thin layer of liquid Min Wax. I thought this last effort had ruined the whole thing. It was shiny and stinky and ugly. I just left it hanging thinking I would throw it away when I got around to it.
But one day it caught my eye because it had taken on a transparent glow and the layers of leaves were more visible giving an interesting depth. And it wasn't stinky anymore. 
I was going to add yet another layer of leaves until it got accepted into the World of Threads Festival. Once our work is accepted we have to promise the work shipped will be exactly the same as the images we sent in with the application. 
I can add the next layer of leaves after it returns home.

PS This is what the Indian plum tree looks like fall 2016
Still alive...

...but the bark doesn't look very healthy where the deer ate it.

The fungus growth on the middle trunk indicates the tree is dying.
Maybe the deer knew the tree was old and on its way out.