Home

Thursday, October 20, 2016

Backyard Project - August, Finally the Rock beds are Flourishing

After working out the bugs in the soil were thriving under a thick layer of straw mulch and eating every sprouting seed, I removed the straw mulch and planted a third lot of seeds. By August those beds were covered in thriving plants.
These purple snap bean plants were most prolific and delicious, along with a yellow variety.

Fava/broad beans matured later and grew tall but I didn't bother staking them.

There were also scarlet runners that attracted insects and hummingbirds to their flowers.

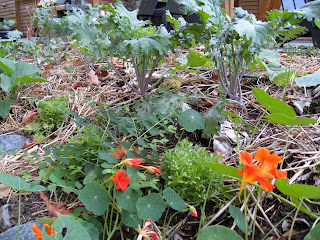
4 different types of kale and a border of mesclun garnished with nasturtium flowers and leaves have kept us in salad greens for 3 months so far. 

The comfrey grew back quickly after its last cut back. I will cut it back again giving it a chance to grow some before the winter and colder temperatures set in.


The globe artichokes and a number of different squash were planted because they grow large and will provide lots of biomass to the soil when dug in. I'm not sure the growing season will be long enough for the squash to mature but in the meantime, they are certainly growing large leaves and trailing along the beds protecting the soil.


I planted 4 different types of potatoes. After a potato patch had been harvested I covered the remains with a thick layer of straw to encourage the soil organisms to get busy at what they do best - making soil.
These green mulch crops have been most successful and the food harvest has been an added bonus.


Monday, October 17, 2016

Horticultural Centre of the Pacific - a regular haunt

The Horticultural Centre of the Pacific is many things and there are many reasons to visit. Ron and I have been members from the first year we arrived on the island and we continue to visit for different reasons.

This visit focused on studying the Butterfly and Insect beds. I was looking for plant ideas for the Water Drop Insectary and Feather Bird Haven hugelkultur beds in our Backyard project

Hmmm... there is a possibility - Amaranth - red to attract hummingbirds, seeds for fall bird feed and it is a dye plant. I am particularly interested in multi-functioning plants.

The Butterfly and Insect bed is right next to the Plant Sale Centre. I whipped out of my bag my plant lists, gave one sheet to Ron and we searched for wanted plants. There was nothing that day but next visit I may find enough to fill the car.

Since I have been building a number of different types of stone walls for the Backyard Project I have been noticing stone walls everywhere. This is one of my local favourites.
We stopped in for a drink at Charlotte and the Quail Cafe before leaving knowing we would be back for the upcoming Fall Plant Sale.


Wednesday, October 12, 2016

'Earth Repair' - 3 Years Later

2014
3 years 3 months after the emergency while living outside wrapped around the Indian plum I brought the 3 afternoon tea cloths inside. 
They were carefully washed, dried and ironed. I was hoping the laundering had stopped the decay processes.

There is much staining and decay and large holes had appeared.
How to preserve this cloth? The usual way to repair a cloth is to darn it but the whole cloth is in such a fragile state didn't think it would support darning. Another way to repair cloth is to add a patch. When I thought about it, adding patches is the way the soil is repaired each year. Leaves fall from plants and trees and cover the soil. Organic processes work on breaking down the leaves to return them to the soil.

I was thinking about this soil repair idea when while out on a walk I noticed the Tulip tree had a skirt of leaves reflecting the shape if its branches. It was using its leaves to replenish the soil it grows in.

I looked more closely at those fallen leaves and saw the majority had decayed in such a way that only the veins were left. They were leaf skeletons.

I collected them up and soaked them in water to remove the soil and pine needles.

I left them to dry.

They are quite lovely in their fragile state. I had this idea to repair the tea cloth with these fragile leaves. I hand stitched leaves directly onto the cloth over the holes. At the top of the cloth I stitched a row of eyelets, wove a jute string through them and inserted a stick I found near the Tulip Tree. 
The cloth hung on my design wall for the year, still too delicate to do anything with.

2015
When the Tulip tree was dropping its leaves again the next year made me look again at the still fragile afternoon tea cloth.
I wanted to add more leaves but I wanted to make the skeletons stronger while still appearing fragile. It was time to sample. I coated leaves with various mediums but they tended to fill the holes and look a bit shiny. I ironed on a fine fusible web. I liked the look.  

I added the bonded leaves but I couldn't iron them in place. I decided to machine sew them in place using the finest thread I had with the finest needle.  I liked what was happening and decided to add another layer of leaf skeletons next fall.

 
2016
I added another layer of bonded leaves using a combination of hand and machine stitching.
The cloth with its leaves was stronger looking but getting very dried out and brittle. I added a thin layer of liquid Min Wax. I thought this last effort had ruined the whole thing. It was shiny and stinky and ugly. I just left it hanging thinking I would throw it away when I got around to it.
But one day it caught my eye because it had taken on a transparent glow and the layers of leaves were more visible giving an interesting depth. And it wasn't stinky anymore. 
I was going to add yet another layer of leaves until it got accepted into the World of Threads Festival. Once our work is accepted we have to promise the work shipped will be exactly the same as the images we sent in with the application. 
I can add the next layer of leaves after it returns home.

PS This is what the Indian plum tree looks like fall 2016
Still alive...

...but the bark doesn't look very healthy where the deer ate it.

The fungus growth on the middle trunk indicates the tree is dying.
Maybe the deer knew the tree was old and on its way out.



Saturday, October 8, 2016

'Earth Repair' - the Beginings

'Earth Repair' began as a response to what I considered to be an emergency situation.
March 11, 2011 - quoting from my journal -
'Emergency. It has been a long winter here on the island. The deer are hungry. They are eating the bark on my precious Indian Plum. I need to care for this tree. The deer have free choice in the rest of the forest - even my emerging spring bulbs but my Indian Plum is not part of their buffet.

I am placing sacrificial tea cloths over the wounds to protect them. First, I lost my needle - I felt vulnerable and inadequate - I couldn't do what I needed to do because I had lost my valuable tool. Flashback to an earlier time when women depended on their needlework skills to survive. A lost needle was potentially a loss of livelihood translating to an increased risk of not being able to adequately care for her family.

I ran inside to get another needle after I had given up searching in the deep layers of moss and decaying leaves. When I returned with another needle I found my first one hanging by a thread - ties in with that vulnerable feeling again.

I was having trouble holding the cloth in place and sewing at the same time which had lead to the loss of the original needle. Then I heard a distant ambulance siren reminding me this is a triage situation.
Another run inside to get my wooden-based pin cushion, given to me by my mother. A reminder of how important life skills are passed from one generation to the next.
I was now performing the required surgery as I pushed a couple of pins into the bark to temporarily hold the edges of the cloth as I sutured it in place.'

The 'Earth Repair' cloth with embroidery wrought by and unknown hand.

Sutured in place around the wound to stop the deer from eating more of the bark. 
I have since read the Saanich First Nations people make a bark tea as a purgative and a spring tonic. Perhaps that is all the deer were doing because they had upset stomachs after having to eat plants not usually in their diet.

Continuing from my journal entry - 'The tea cloth continues to function - to protect wood and in doing so sacrifices itself to the elements - it was raining as I secured the cloths in place.
Inside the home, the cloth would be used to present food - outside it is now protecting the bark so the tree can get its food....
The cloth has been taken from the horizontal to the vertical plane. Does it still read as a table cloth? It has been taken from a smooth flat object to a wrinkled curved form. Does it still read as a cloth?'
These were musings for the development of work while I was studying for a BA (Hons) in Embroidered Textiles. After 6 years of study, my graduation exhibition work was related to my thoughts and actions on this Day of the Emergency.

Wednesday, October 5, 2016

'Earth Repair' Makes it into the World of Threads Festival 2016

Lesley Turner, 'Earth Repair' 36" x 35"/92 x 89 cm, 2011 - ongoing, embroidered (anonymous) vintage cotton afternoon tea cloth, leaf skeletons, cotton & polyester thread, jute string, wooden branch, MinWax; tree staining, washing, ironing, hand & machine applique, waxing.

This work has been accepted into the World of Threads Festival 2016 in the 'Late in the Season' exhibit in the display area of the Queen Elizabeth Park Community and Cultural Centre in Oakville, Ontario, from Saturday, October 29 to Sunday, November 27th, 2016.
Whippee!

I spent most of the day following the instructions in several emails explaining exactly how to get the work ready for hanging and how to box it up.
I made a box so the work will fit snugly and not move around much while in transit. I made the box with a reuseable cap so it can be reused to return the work. 
The work can not be folded or even rolled because of the many layers of delicate, dried, leaf skeletons stitched to the cloth. 
Inside the box, I made a suspension system to hang the work from the top. 
I sewed together pieces of bubble wrap to make a snug bag to pad the work while it is in the box.
Then there was all of the documentation required. Make a label with details of name and title and secure it to the back of the work. Type up hanging instructions with images. Put my name and email on every piece of packaging and both parts of the box. Include a spare set of hanging devices - just in case. Phew!
Now to wait until the right day to mail the box so it arrives between the 2 dates set for the arrival of work in Oakville. 

Dawne Rudman and Gareth Bate are the organisers, curators, festival originators and all of the other jobs it takes to mount such a large exhibition of work from around the world - 134 artists from 24 different countries. You can see why I am very pleased to have work selected again for this festival.

Dawn and Gareth curate the exhibitions with a system I think is unique to their festival. They put out an international call for artists' most recent work and wait to see what comes in. They look at images of the work while identifying some common themes. Work is selected that fits the chosen themes. That's how I think they work.
Next post I'll tell you why this unassuming work has taken 5 years to make - so far.


Sunday, October 2, 2016

Backyard Project - Moisture - Mulch - Mulberry


Ron calibrating the moisture meter.
When the rains stopped late June and our dry season began we had to start hand watering all of the new beds. The irrigation system in the backyard had been destroyed by all of the construction and earthworks. The irrigation company we wanted to use was booked up for months ahead but they couldn't start anyway until the next phase of construction was underway. We were a bit tardy on getting that next phase of construction going. I was busy focusing on keeping the new soil beds alive with soil building activity.

After a month or so of me leaping out of bed before 7, every third day, to go and hand water all of the new beds for a couple of hours and coming inside with my PJs wet through Ron got into planning mode and set up a temporary irrigation system. It involved multiple timers, different types of hoses and a range of sprinklers.

In some places, the perfect spot for full coverage by the sprinkler was to set it in the middle of a path. Priorities. It took Ron several weeks of shifting sprinklers, gauging water pressure, testing soil moisture with the water meter and fine tuning the timers before the system could run with less attention.
I have drawn up a moisture level plan for each garden bed with different amounts of soil moisture  related to the number of hours of sunshine and the type of plants to be planted in each bed. The moisture requiremnets are different in each area which added to the complexity of setting up a manual irrigation system.
As some garden beds filled with plant growth the watering needed to be adjusted and all of the newly planted trees continued to need regular watering of a couple of months. We continued to monitor the system over the whole summer.
This year the rains started again with a sprinkle on August 28th and the irrigation system has been turned to manual. I still need small amounts of water now I am into to fall planting.
We are very pleased we got through the summer without any loss of life and now have beds full of deep rich soil. 

Davey Tree Truck full of freshly shredded tree prunings.
Ron made contact with a local Davy Tree company owner who lives near our place. When he has a truck load of good quality shredded trees and prunings he arranges for his truck to swing by our place and dump the load. It is convenient and a cost saving for them and a load of gold for our garden. A win-win situation.
We were finishing off the second mulch pile when the Davy truck came by with a third load this summer.

I must say I am fascinated watching the details of how vehicles work.
This driver displayed impressive driving skills when he backed his large truck in under a tree to dump the load exactly where I wanted it.
Here he is at Control Central with safety vest and ear protectors on. Stabilising legs go down, the cherry-picker hoist is raised, the back door is opened, the tray is raised, the load slides out - all with accompanying different warning signals.

And there it is. I am going to ask Sammy to bring around another load of spent hops from a local brewery to mix into this pile to get it activated and to speed up the breakdown process. 

And... I found a very healthy mulberry tree for the Leaf hugelkultur bed - more details about the tree choice later.


Tuesday, September 27, 2016

Backyard Project - Planting in the Gravel Bed Garden

Gravel Bed garden
The plants I planted a couple of months ago are thriving, confirming my design criteria for this bed will work.
All plants must be culinary and/or medicinal, able to thrive in full sun, suited to well-drained soil,  need only low levels of water, and have blue to purple flowers with the odd one having yellow flowers.

Confident my design will work I have visited several nearby nurseries to find plants that fit the spec.
Here I am making a path through the bed using low growing plants that can take light foot traffic. I have found many different types of thyme to begin the path.

The rosemary and sage I transplanted from other old beds are thriving. I will be able to take cuttings from the rosemary once the rains begin again.  I will propagate these cuttings for another project I have in mind.
I have marked the spots for the path plants with empty pots weighted down with stones. 

The thyme path meanders through the bed like a river. 
I have read lots of books and checked many websites to make a long list of suitable plants. I keep this list in my bag ready for when I am in the vicinity of a nursery. It is a list of plants for the spots either side of the path and between the stone wall.
I have found out I love reading about a plant, visualising how it would look in a particular spot, and checking on how well it would relate to the other plants around it. 
When I look at this Gravel Bed garden I see it full of mature plants and looking beautiful. I imagine walking slowly along the meandering paths smelling and tasting leaves and harvesting a few springs for the dish I am preparing in the kitchen. There is a spot for a bench which will slow me down even more. It is what I need.

Saturday, September 24, 2016

While the garden grows I am at work in my studio...

While the garden grows I am at work in my studio.

A new work. 
The challenge - how to express what is the province of Alberta on one double-sided panel?
I decided to depict the diversity of landforms in the province - landforms shaped by glacial and tectonic processes.
The schematic with a beginning sample. 

Cutting out the shapes.
I decided to focus on the interlocking shapes of the different regions and I felt colour would be a distraction. I auditioned a variety of different unbleached cottons from my stash. I selected mainly handwoven cottons from India. I washed these fabrics and lightly tumbled them dry to allow their different weaves to naturally collapse into wrinkles unique to each cloth.

Problem - how to make a neat double-sided join?
Solution - couching hand-made jute braid from India that I just happen to have in my stash, patiently waiting until needed.

The different landform shapes have been joined.
Yes, the landform edges do need more definition.

Hmmm, not sure about the outline. Is it too dark? Too wide? Does the whole panel need a wider border?

I added a border of a wider jute braid.

Nope - I don't like the way the outline of each shape takes away from the feeling of the different landform regions being related to each other. So I unpicked all of the braid on both sides.
I sewed on a much thinner jute braid.


Much better. 
Now to block the whole panel just enough to make it hang straight while not flattening out the natural landform wrinkles.
I think this must be the first work I have made without the use of my trusty irons.