Home

Monday, November 23, 2015

Studio Sewing Centre

While making pillow covers from molas, I also used the Sewing Centre.

View from the front door looking at the Project Table and Design Wall.
The Sewing Centre is to the right.


The Sewing Centre is basically the same setup I had in my old studio. It worked and I couldn't come up with a better solution until I had worked in this new space for a while.

The sewing table was a daughter's desk I seconded when she left home. It is large and works well.
For my birthday, I have asked for a new sewing chair. It was a used chair when I got it and I have recovered it twice, but now the foam is disintegrating. I need a chair in a desk area I am setting up in the house so this one can go there.
In an otherwise dead corner under the table is a tiered basket on wheels with all of the tools and equipment for sewing.


I like old 50s to 70s government issue furniture. It is usually well worn and very functional. This old map cabinet is where I sort and store stabilisers only a chair swivel away from the sewing table

A 2nd table holds the serger/overlocker. It can easily be moved to the top of the stabiliser/map cabinet when I need to work on the embellisher. They are both light machine and easy to lift into place. I don't use them as often so it wasn't worth the real-estate to give them each a table.
The one chair works with both tables.

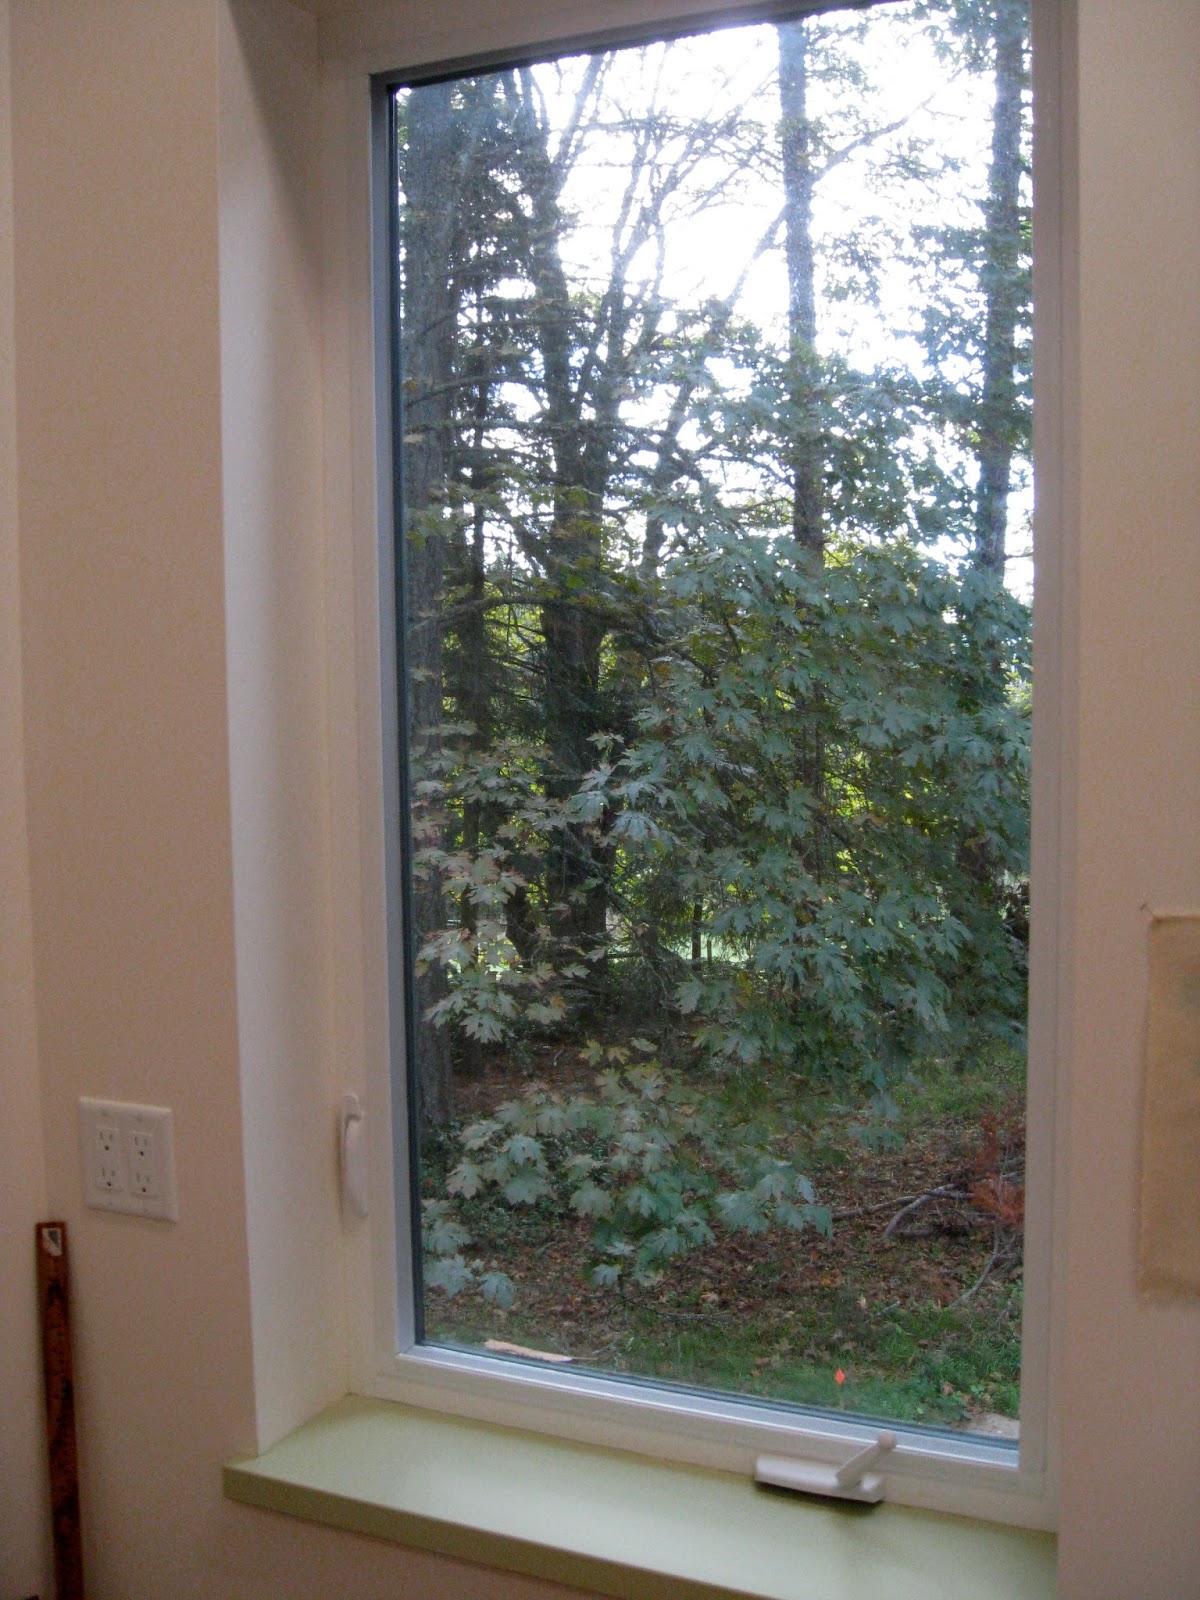
Over the cabinet is a window with a view of the forest. It lets in soft south easterly light and keeps me in touch with what is happening outside.
One thing I have been disappointed with is 2 birds have flown into the front windows of the studio. I had thought the lower porch roof would stop them from thinking it was a place to fly through. Hopefully, once the plantings in front of the studio are in this will happen a lot less.

From the Sewing Centre, I walk along the design wall to the back of the Project Table to shelves with boxes of machine threads. No natural light can reach them so they are protected from fading and premature ageing. 

Mola - detail
The old Sewing Centre still works in its new location so I guess I won't be changing anything in the near future. But I will continue to look out for design ideas to improve the space.

Friday, November 20, 2015

Making Mola Pillows working at the Ironing and Cutting Centres


While making the mola pillows, I worked at 2 more centres in my studio.

The Ironing Centre
The ironing board has an extension to make it a rectangular shape better suited to ironing lengths of cloth. I have 2 irons a steam iron and a dry iron.


The power outlets for the irons and the sewing machine were put into the floor to keep the cords from crossing the work surfaces.

The rack under the ironing surface holds a variety of pressing clothes, water sprayers and spray starch.

The Cutting Centre
After the mola had been steamed I walked a couple of steps to the cutting centre. 
It sits in the middle of the area where I can move around all 4 sides while cutting. It saves on the number of times the fabric has to be repositioned.

The left-over cork floor tiles on the left I thought would make a useful cutting surface when using the Exacto knife but the cutting rulers bumped up against the tiles so they had to go.

I moved them across the walkway to the drawing centre.
After a minor adjustment, I found the Ironing Centre and the Cutting Centre work fine.


Saturday, November 14, 2015

Etsy Ravenmadeworks - Mola Pillows

I have made a series of pillow covers using refreshed vintage molas and put them in my Etsy shop Ravenmade Works.
Molas are the embroidery of the Cuna Indians of Panama. They live on the San Blas Islands on the Atlantic side of Panama.
This well-worn mola (above) is a relatively simple design with strong mirror symmetry, all features of older traditional work.

The back shows the ground fabric has been made from 3 different fabrics pieced together and they have faded at different rates.

The front view of the 3 different red fabrics making up the ground. 
Orange then black fabric were layered on top of the red ground then the 3 layers were basted together. Smaller pieces of different coloured fabric were inserted into specific areas according to the design - see the green and white areas above. 
The design was drawn or traced onto the top most layer then basted with thread along the design lines. The top layer was cut about 1/8" on each side of the line before the cut edges were folded under. The folded edges were hand creased then the edges were hand stitched down. It is an embroidery technique known as reverse applique or cut back applique.


The traditional designs evolved from elaborate body painting and reflected things observed in the environment. 

This mola has inserts of printed cloth most likely acquired by trade or from visitors to the islands.

'Mola' means blouse and they were made in pairs - two identically designed rectangular pieces, one for the front and one for the back of the blouse. The horizontal line denotes the top of the panel, often accentuated with rick rack.
The above mola is more complex in design and detail and has many different inserts suggesting it was made for the tourist market. 


The back shows the density of the hand stitching necessary to execute a more complex design.
The purple strip at the top was likely the fabric the mola was attached to to make the yoke of the blouse.
It was very popular in the 60s and 70s for travellers passing through the island archipelago to buy molas. Women would sell their worn blouses and make new ones to wear. 


Today most mola production is for the tourist market generating valuable income families have become dependent on. Many contemporary molas are made in a wide variety of sizes, are often simpler, as above, or more complex to get higher prices and are brighter in colour. They are incorporated into clothing and home decor items to add value to the product.

Traditional Mola Blouse worn by a San Blas woman.


Thursday, November 12, 2015

New Studio: The Project Table and My First Project

Going into my new space to work, for the first time.

I decided the perfect first project was to work on making pillows for my Etsy shop Ravenmadeworks.
I hauled out my pile of 'refreshed' textiles and sorted through them on the Project Table.

I settled on a set of old Panamanian molas.
The Project Table is where I work through ideas while handling selected textiles and threads.
One of the top drawers contains all sorts of  methods for transfering designs, motifs and patterns on to cloth.

One side of the table's end holds bolts of fabric. The Project Table's solid side faces all of the windows.

The back shelves face the design wall and away from the windows and light. They hold machine threads.
The left drawer holds different types of scissors, tape measures, cutting rulers and other cutting tools.
The right-hand drawer is empty at present, but no doubt will be filled with things I find need while working at the Project Table.

Thursday, November 5, 2015

'Forest Flowers 3' in VISDA Current Threads 2015: Garden Tapestry Exhibition


"Forest Flowers 3"
Here is my entry in the VISDA Current Threads 2015: Garden Tapestry exhibition.
Triptychs were accepted as long as each panel fit the specified size.


The first step in the making process was to dye a well worn bed sheet with a number of different coloured earth dyes.

Small torn squares of cloth were wrapped around different sized beans and secured.

The bundles were dyed with earth dyes.

Stitching on these squares became my portable sewing project for a couple of weeks.

Two more bed sheets were dyed with earth dyes.

Different fabric paint colours were trialed on the first bed sheet.


Another layer was added with motifs screen printed with fabric paint.


The hand stitched squares were pinned then moved around to find the right placement.


The three bed sheets were torn into strips, layered and the small squares pinned on the top sheet again. 
I decided it needed more squares.

Once their placement was confirmed the small squares were hand stitched in place.
It was a most enjoyable project to work on.

"Forest Flowers 3" is about the role mycorrhizal fungi play in the wellbeing of a forest ecosystem. 
The screen printed motifs are drawings of computer generated models of the fungi's growth patterns.  
Mushrooms are the fungi's flowers and they are the stitched and appliqued pieces of cloth.
The viewpoint is one where the viewer is in the soil looking up, much like an earthworm's view of the world. The idea is we humans need to shift our way of seeing the natural world if we are to become less invasive and destructive.


Monday, November 2, 2015

VISDA Current Threads 2015: Garden Tapestry

I want to make another post about the Vancouver Island Surface Design Association's current exhibition because every work is such an excellent example of  the many techniques fibre artist's have to work with.
The above detail is Linda Elias's "Beet Harvest" where she used actual beets and leaves on a Gelli-plate to print on the cotton fabric and she added a layer of stamping. She backed the cotton with a hand woven wool cloth and machine stitched into the layers before adding hand stitching and beading.
Linda's expression of the excitement in bringing in a plentiful harvest moved someone because they bought the work even before the official opening. Congratulations Linda.


Lori Mudrie's "Thistles and Lace" (detail) has to be seen to be fully appreciated. This work is much fresher and softer looking than what you see in this poor image. What you are looking at are all fibres and fine thread. She needle felted a variety of different rovings blending the colours in a painterly way then she incorporated hand and machine stitching to catch the characteristic forms of thistles and Queen Anne's Lace.


Laura Feeleus's "Conservatory" (detail) shows a number of the different ways stitches can be used to attach items to a ground. On the right are dried rose petals trapped under hand-dyed silk. On the left is a vintage lace doily held in place with a layer of sheer silk and french knots. Elsewhere on the work are tree seeds and stones held in place by hand stitches.


Christine Fawcett's "Dawn's Delight" (detail) shows raised surfaces using a number of different techniques: furrowing, Kantha, and spot applique. Silk taffeta was dyed with avocado skins and eucalyptus bark using natural dyeing techniques.


Jo Ann Allan's "Medieval Garden" (detail) has many historical textile references going back to the European Middle Ages. It is also a showcase of exquisitely worked hand stitches, techniques that have been practiced for centuries: Hardanger, blackwork, casalguidi raised embroidery.  In other areas of the work, there are machine embroidered slips, a contemporary take on an Elizabethan technique for applying heavily embroidered pieces to a ground. The old and new have also been combined with a traditional linen ground fabric and an area of hand-made silk fusion fabric.
Jo Ann is the co-ordinator of this exhibition and has done an excellent job in organising the details and communicating them and the deadlines to all of the artists. The theme is gardens and Jo Ann began by sending members a 3-page list of ideas related to this theme which I am sure was a great source of inspiration for many of the works in this exhibition.

The exhibition is on for another week, ending November 10th.
I do hope you can go and see this exhibition if you haven't already done so.


Saturday, October 24, 2015

VISDA Exhibition 'Garden Tapestry' at Portals, Duncan

Louise Slodoban, 'In An Artist's Garden' 
Photo transfer, procion dyed cloth, mono printing, screen printing, sun prints, machine & hand stitched.
Louise was inspired by a visit to Grant Leier and Nixie Barton's Studio Garden at Yellow Point.

The Vancouver Island Surface Design Association has an exhibition in the Portals gallery in the CVAC Centre of Arts, Culture and Heritage until November 10, 2015.

Georgina Dingwell, 'At Night in the Garden'
Printed surface with silk overlay and stitching.
"This piece is about the way we perceive darkness. The mind can take us to scary places even in the realm of beauty in a garden."

All artists worked within a 12" x 60" or 72" framework so there was uniformity in the size of the works. This serves to unify a wide range of styles, techniques, materials and ideas.

Elserine Sprenger, "karesansui" (dry landscape)
Handwoven, linen, silk, raffia, stones, madder, indigo.
"This piece is woven in a partial double weave structure and symbolises the strength and at the same time the fragility of Mother Nature; the stones that have survived millennia and the linen which so easily deteriorates when exposed to the weather."

 
karesansui (dry landscape), detail

Sarah McLaren, 'Joy'
"Own hand dyed linen/cotton blend fabric, hand appliqued with silk thread, machine quilted, wool batting, binding done by hand. 
Inspired by whimsical floral shapes, open weave linen, a love of colour subtleties and a passion for fabric and stitching, my intention was to design and create a joyful art-quilt garden tapestry."


'Joy,' detail. 
Sorry, the colours are way off in these images of the works. The gallery has the work well lit which makes for difficult photographic conditions.

Sarah beside her work. 
The colours here are closer to reality, but images of textiles never really do them justice. You will have to go to Duncan to see for yourself. 

The exhibition is on until November 10, 2015.
The gallery is open Monday through to Saturday, 10 am to 5 pm.

Sunday, October 18, 2015

Studio Design: Pattern Language #134 Zen View & Keystone Species

Pattern Language #134 'If there is a beautiful view, don't spoil it by building huge windows that gape incessantly at it. Instead, put the windows which look onto the view at places of transition - along paths, in hallways, in entryways, on stairs, between rooms.
If the view window is correctly placed, people will see a glimpse of the distant view as they come up to the window or pass it: but the view is never visible from the places where people stay.'

The Green Shed has two Zen windows, one either side of the design wall. Jonathan Aitken, our architect, did a great job in locating them. The project table and print table are mostly kept (they are on wheels) in front of the design wall. As I work and walk around the tables I catch glimpses of forest views. A glimpse is enough to keep me connected to the outside without being a distraction from the work in hand. 
Not long after I moved in I was distracted by a familiar knocking sound. Curiosity made me go up to the nearest Zen window.

A Pileated woodpecker was at work on a tree we hoped would become a wildlife tree. 
The tree had shown signs of decline after the nearby 12-year-old septic field was keeping its roots too wet. Douglas-fir like to spend most of the year with dry feet. Several of its neighbours had blown over during winter storms. We didn't want this one to fall on the studio so it got cut down before it fell down. 
The knowledgeable lumberjack left a 20-foot high stump and roughened up the top with his chain sawn. We hoped the tree was large enough for the fauna to think it was an ideal wildlife tree. 
I was so delighted when I heard that knocking sound. I knew what it meant.

This bird had decided the tree was suitable to work on. Above right you can see their characteristic rectangular shaped hole which opens up the tree to other birds and insects as a food source and nesting sites. The hole gives access to fungus colonies that soften and rot the wood. Then the next succession of smaller birds can work on making nest sites and foraging for food.
It is for these and many other reasons the Piliated woodpecker is a Douglas-fir forest keystone species.

Click the above link to read a scientific examination of the importance of this bird for the wellbeing of the Coastal Douglas-fir ecosystem.