Home

Thursday, June 8, 2017

Backyard Project: Hot Tub Area Converted to Hot Garden Bed

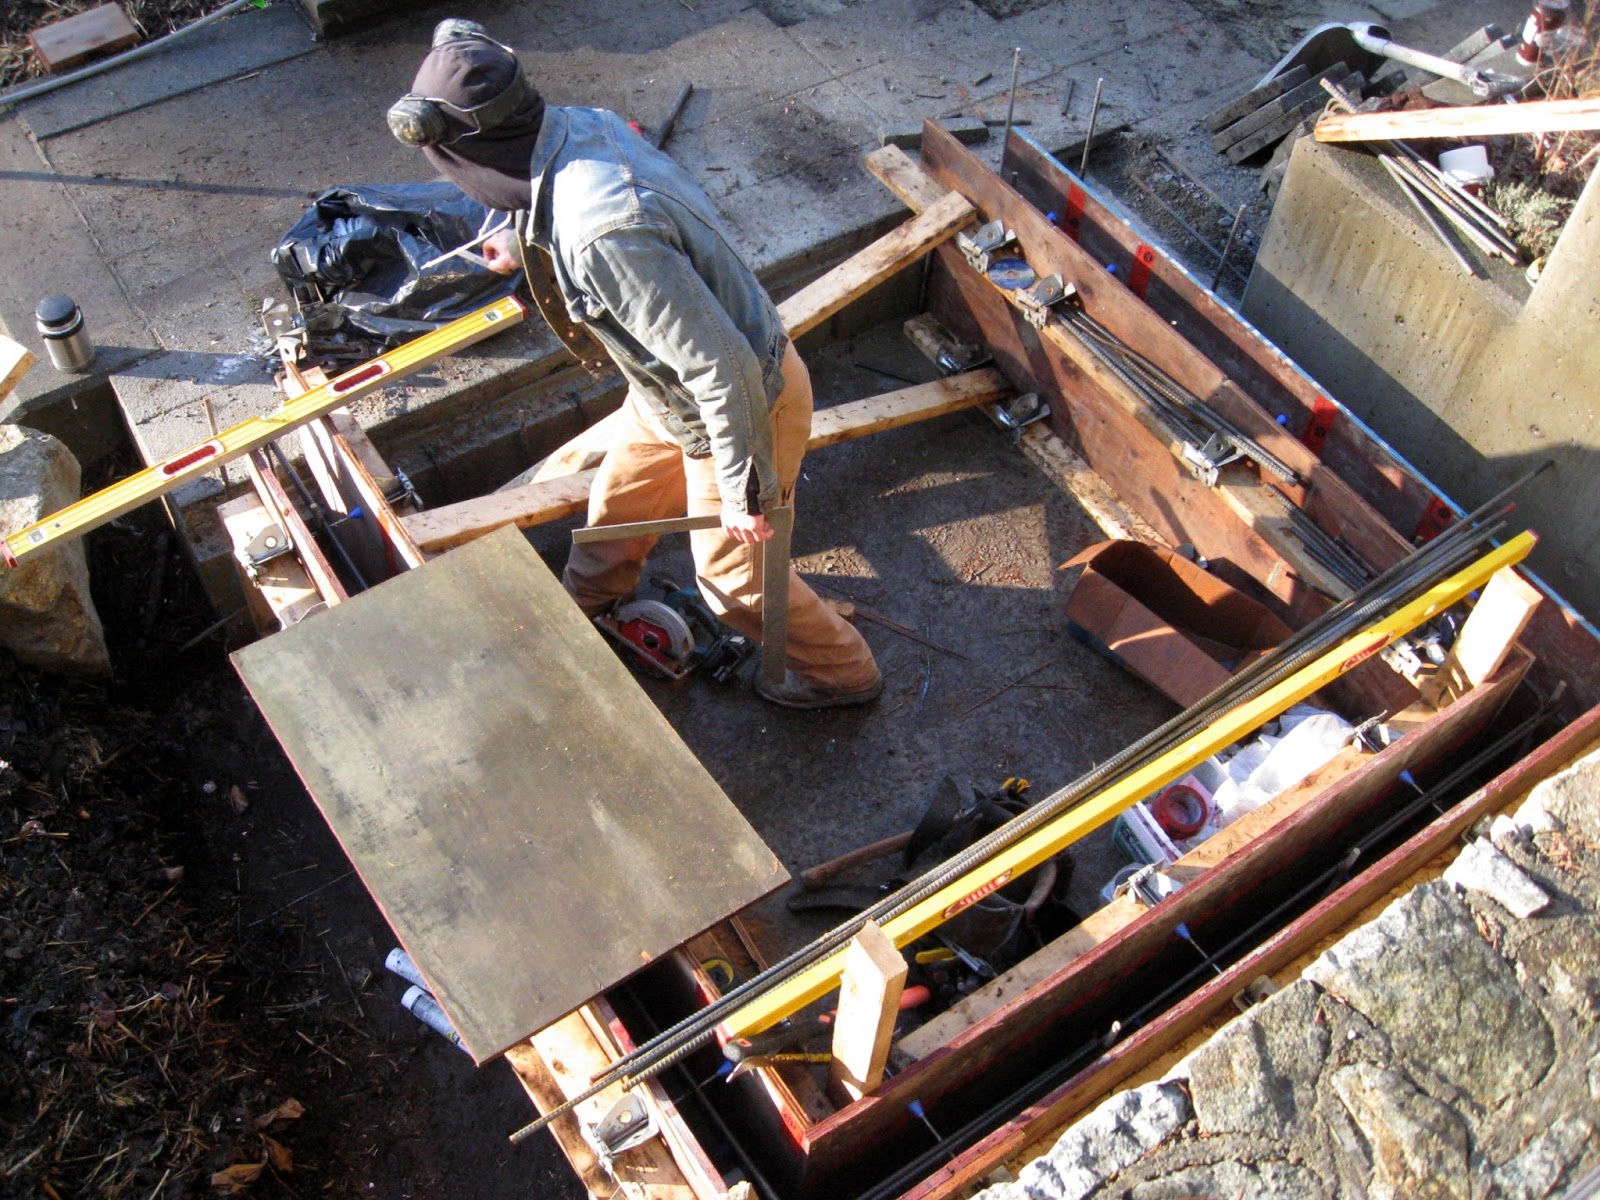
Equipment needed to convert a hot tub area into a hot garden bed - a noisy concrete drill, rebar, a rebar bender (out of sight).

After attaching rebar in strategic places Josh is building formwork to support concrete while it is setting, hardening and curing.

He is following Jonathan Aitkin's (architect) drawings ...

...who followed my very rough conceptual sketches.


Both sides of the formwork for the concrete walls are in place. Jonathan designed the concrete walls to be the same as the 2 concrete garden boxes on the right. These 2 concrete garden boxes are the only ones built like this in the whole place. They stood out. Being connected to a whole area of the same design they now look as though they belong. Once they are planted they will look even better.

The concrete wall makes a good sized garden bed on the east side. 
I have great plans for this spot.

Josh and Taylor put in a long day to get the concrete mixed and in place. This area is below 9 steps and above another 9 steps so it is rather an awkward place to work. Josh decided it was easiest to mix all of the concrete and place it by hand rather than get in machines. There wasn't enough concrete needed to justify a concrete truck with a pumper truck and telescoping hose to reach the spot. It took a lot of muscle power to carry bags of cement and wet mixed concrete all day. They did a great job.

The wet concrete was covered at night to keep the frost off it (this was back in March) and uncovered during the day.

Once the concrete had cured the clamps and formwork came off and viola, a garden bed area. Josh has to make the single step down into the area then my work can begin. I have already ordered some of the plants to go here.
Another structure in Phase 2  of the Backyard Project nearly completed

Monday, June 5, 2017

New Work: 24 Synesthesia Colour Studies

I continue to work on my Synesthesia colour studies.

I used lots of thread on this one.

For each colour, I also work in paint and fabric to show a range of tints, tones, shades and intensities of each colour.

I went pretty dark with this colour - mmmm one of my favourites.

When I am in full swing all of the horizontal surfaces in my studio are in use. While one thing is drying I can get on with something else. 

Making progress but still lots to do to finish this series.

Monday, May 22, 2017

Backyard Project: Rocks - Rocks - Rocks, 'Use What You have'

One of the principals of permaculture is to use what you have on the site.
What we have in abundance is rock - hard granite rock.
Above shows one of the sites where a huge boulder (or was it bedrock?) was blasted - I posted about it here. The site needed to be levelled out before the pergola could be built.

The biggest rocks were moved out of the pergola area to a temporary place near where they are to be used.

The middle-sized ones - the maximum size I can carry - have been used to edge garden beds. I like making rock garden edges. Taylor placed bigger rocks under the cedar fence to stop baby deer from crawling under it.

The smallest rocks from the site plus all of those on the to-be pathways and those I dig out of the garden beds are collected up and wheelbarrowed....

...to make a random rock edge on the right side of the pathway going up the east side of the house to the front. For the edge on the left of the path, I am fitting the rocks together to define Gunilla's garden bed. This was the first rock work I attempted and my skill level has improved so much since then I will be going back to rework this little wall.


Rock from the blast site where the sheds are to be built was moved by Josh using the Bobcat to make a random rock wall along the track, post here. The rock wall had a lot of soil as well which I didn't want because the seeds in the soil would grow and cover the rocks.

I spent many hours cleaning off the rocks with the frequent rains helping the job along.

Once I had cleared most of the soil off I scattered about 15 different types of seeds hoping they would germinate in the remaining soil pockets. 
It has been a lot of work moving these rocks in place but with good planning, we haven't had to move them far and we are making use of all of them. We will not have to pay for any rock removal.
"Use what you have" - check.

Backyard Project: Irrigation - A Big Job

Irrigation installation equipment: measuring wheel for finding distances, coloured flags to mark zones, grubbing mattock to dig trenches.

Mike Isacson, the owner of Island Waterwise Irrigation and assistant David, arrived in February to install an irrigation system in the backyard. I first met Mike several years ago at an irrigation workshop he had volunteered to run for the CRD. I was most impressed with his level of knowledge and his irrigation philosophy. He had been a landscape gardener before deciding to specialise in irrigation when he found so few people really understood what it should be.  

There had been an extensive irrigation system before we started the Backyard Project but most of it got destroyed during construction. We did not try to preserve it because the whole area was to be reconfigured. New main pipes had to be installed in trenches.

It was tough going digging those trenches in the rocky soil. And the weather was cold.
The original system watered a huge lawn which covered most of the area that is now the Backyard Project. The new system focuses on new raised beds while the pergola, arbour, gravel bed garden and new paths do not need an irrigation system.

I had drawn a map dividing up garden beds into different areas with different water requirements. I walked around the site with Mike to explain the areas. Mike then walked around and visualised the different zones needed and marked them with different coloured flags.

We had made contact with Mike in the previous fall but he was very busy and not able to get to our place until February. I knew the garden beds would be dug up to lay the pipes so I planted only the tree in each bed and grew cover crops that needed to be dug in any way. By the time Mike arrived all of the cover crops had been killed off by the frost. 

Each zone has its own coloured flag. I asked Mike to leave the flags in place so I could become familiar with each zone once we started using the irrigation system. We will program each zone according to how often and how much water it needs during the dry months.


This is the spade David used to dig the trenches, called a trenching spade, obviously. I was so impressed with how carefully he dug out the soil then replaced it after the pipe was laid.

David is laying pipe along the top of the Feather Hugelkultur Bed. Mike works along the fence in the new bed. You can tell it is cold by how well dressed they are - hat/toque, gloves and winter jacket are required.


Flexible pipe is installed in the trench then different fittings are attached depending on the type of irrigation needed.

One of the control areas for the different zones. This is covered with the green lid so it can be accessed when needed.

There were a couple of days during the installation when conditions were miserable. This day first the roofers stopped because they couldn't get the bitumen warm enough. Then Mike and David left because they couldn't see what they were doing. Josh and his crew left not long after because of the same problem. It was an unwanted Snow Day holiday.

Saturday, May 20, 2017

Backyard Project: New Studio Footwear and New Garden Bed

I wrote a couple of posts about the shoes I wear going to and from the studio and inside the studio here and here.
With the past snowy winter I had to add another pair of footwear - waterproof rubber boots with New Zealand wool liners. These are also my gardening boots. It is usual to wear longer boots when gardening in forest areas to protect the legs from deer ticks.

Recently I added a pair of Skellerup 'Red Band' flip flops/jandles/thongs to my studio shoe collection. I purchased them in New Zealand where they and 'Red Band' gumboots are de rigeur when in the countryside. Now the paths have been leveled and covered with gravel it is no longer hazardous to walk to and from my studio and these are perfect for slipping on and off during the warm months.

Finally the lumber Josh ordered came in and he was able to finish the cedar fence with the top beam.

In theory that meant there would be no more construction activity in the area between the fence and the studio. Finally I could get going on making the new garden bed.
The soil is in rough shape. It has been driven over, walked over, turned into mud over the rainy season and dust in the dry season. It is thoroughly compacted, full of rocks and stones and has little organic matter - so I need to provide the conditions for the soil organisms to make new soil.
First I dug it over taking out all of the rocks in the first few inches. Then I covered it with a thick layer of all the paper and cardboard I had collected from the house and from dumpster diving.
This paper is the 'Party Time' signal for the earthworms, woodlice/slaters and hundreds of other bugs to start partying/eating. 
Normally this layer has to be soaked with water using the hose but the outside water has not been turned on for the season yet so I made this first layer the day before rain was forecast. As predicted, it got thoroughly drenched.

I measured out the path and started construction of the rock edge using rock blasted from the pergola area.

Next layer - coffee grounds courtesy of our local coffee houses/cafes. As I have posted about before - the coffee is the green and the filters and coffee cups are the brown in the compost mix.

Then the muscle moved in dumping wheelbarrow loads of a 'cooked' spent hops mash from a local brewery and the shreddings from a nearby landscaper - a potent mix.

Tah dah - new garden bed. While the soil organisms do their work transforming the layers into soil  I have the pleasurable task of planning the plantings.
Taylor placed the rocks along the bottom of the fence so the bambi deer could not squeeze under it and get inside the backyard. The mother deer on the other side do crazy things when this happens.

 I think of this as a bonus garden bed. I didn't have it in my original concept design and I didn't know how big it would be until the fence was in place and the path was marked out. Not only is it a big bed it is also a pleasing shape.


Thursday, May 18, 2017

Backyard Project: Finishing the 2 Roofs

The roofers arrived to put the final layer of bitumen on the shed area roof.
This layer has a rough grit stuck to the surface to make it more weather resistant.


Roofing or clout nails with a big flat, umbrella head. 
The roofer hammers with a 2 stroke rhythm to drive the nail home.  


In the meantime, Josh is working on the Propagation Room roof.

He is slipping in place each section of 3 boards. The boards are held up out of any rain water by plastic wood blocks that won't rot. We will be able to lift out the panels to clean the debris off the roof. The black part of the roof is sloped towards a drain hole.


Thursday, April 27, 2017

Backyard Project: 2 Different Roof Systems Serving 2 Different Purposes

He looks like a ghost buster but he is a roof layer - a torchon roofer. 

Nortek Exteriors is back to install the same sort of roof they put on the studio - a torchon roof.

First, a layer of fireproof fibreglass felt is nailed in place. 

For the next layer, a sheet of bitumen is melted and sealed in place with a butane torch. 
While continuing to be used extensively in commercial buildings because it is easy to install and repair and is one of the cheapest roofing materials available, it is a somewhat controversial because it is made from similar materials to our roads. 
The reason why we decided to go with the torchon roof on the studio and garage is I want a green roof. Under the forest canopy, mosses and lichens will naturally colonise the roof while feeding on the bitumen. It will last 15 to 20 years which is a shorter life span than some other roofing systems but it is easy and inexpensive to scrape off the mosses and add another layer of bitumen on top of the old. Though they do last longer other roofing systems need to be removed and put in landfills before the new material can be installed.


The other controversial roofing material is going on top of the propagation room.
The flashing has been installed.

The lumber has been delivered - Kayu Batu - a sustainably harvested hardwood from SE Asia. Some would argue it is irresponsible to use hardwoods from other countries and that would include buying furniture made from hardwood. 
We decided to go with the hardwood because treated like a piece of furniture it will last as a roof for up to 50 years - a better option to replacing local wood decking every 6 to 10 years. We live in a rainforest where conditions are perfect for breaking down and rotting wood. Kayu Batu is suited to these wet conditions and is resistant to mould, fungus, wood rot, insects and fire. It does not require the usual yearly painting or sealing. It can be oiled to keep the rich colour or it can be left to age to a silver grey, which we will be doing. The only maintenance will be keeping it swept.
Josh ordered 10-foot lengths to cover the 10-foot wide deck so there is no waste wood produced during construction.

Josh made a jig to get an accurate positioning of the supporting cross members made of water resistance composite wood.

He is making panels of 3 board lengths.
Installation details in a later post.
2 different roof systems serving 2 different purposes - 1 to provide food for living organisms the other to resist living organisms.